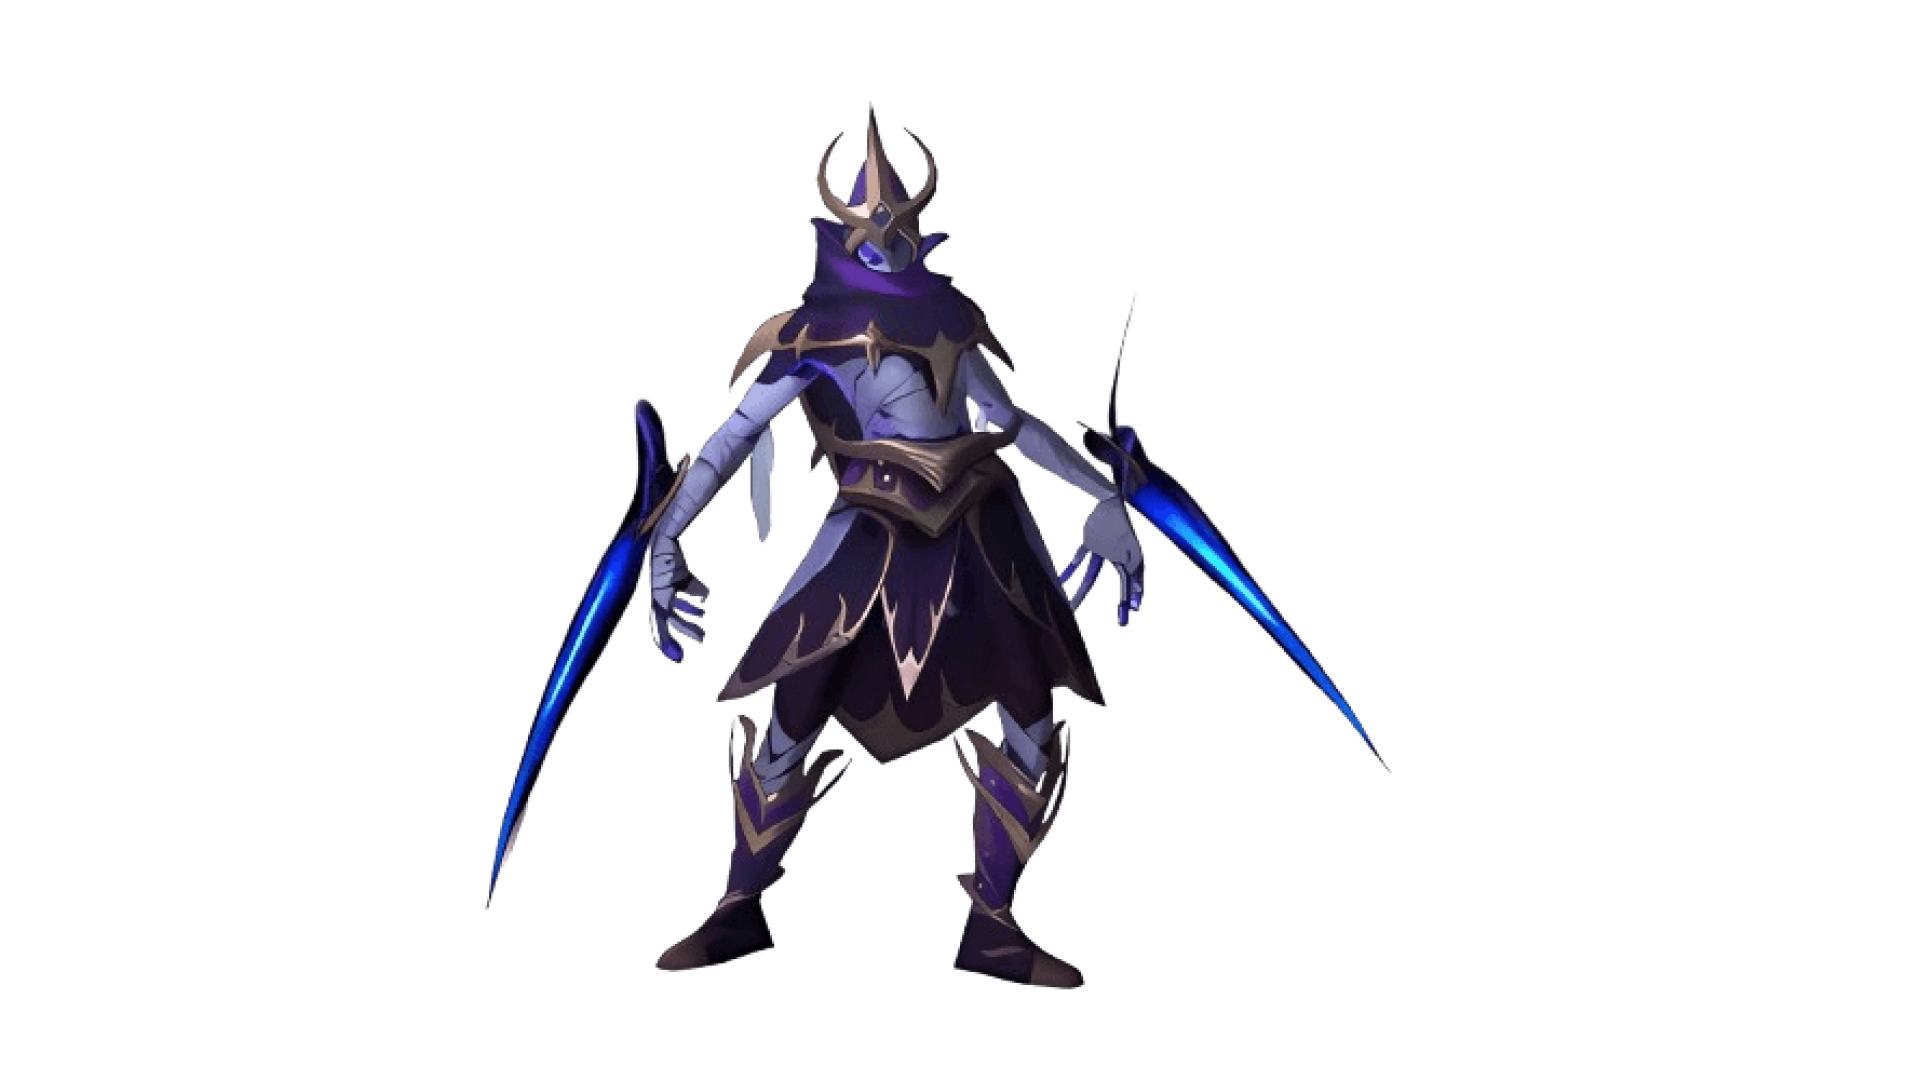
Nexus-Princess Ky'veza
This guide is specifically designed to help players defeat the sixth boss in the Nerub-ar Palace raid on normal, heroic, and mythic difficulty.
This is not just a guide - it is a detailed step-by-step instruction on how to kill Nexus-Princess Ky'veza.
In this guide you will find:
- General guidelines for choosing talents and using bursts;
- Detailed instructions on countering boss abilities;
- Tips for each game role (healer, tank, fighter);
- Battle maps showing positioning and movement;
- Second-by-second recordings of boss actions based on the actual timeline.
Can't handle the boss yourself? We can help! Apply for a raid.
General Information:
- Choose your talents to deal as much damage as possible to a single target.
- From the first seconds of battle, use bursts, potions, and Heroism (BL).
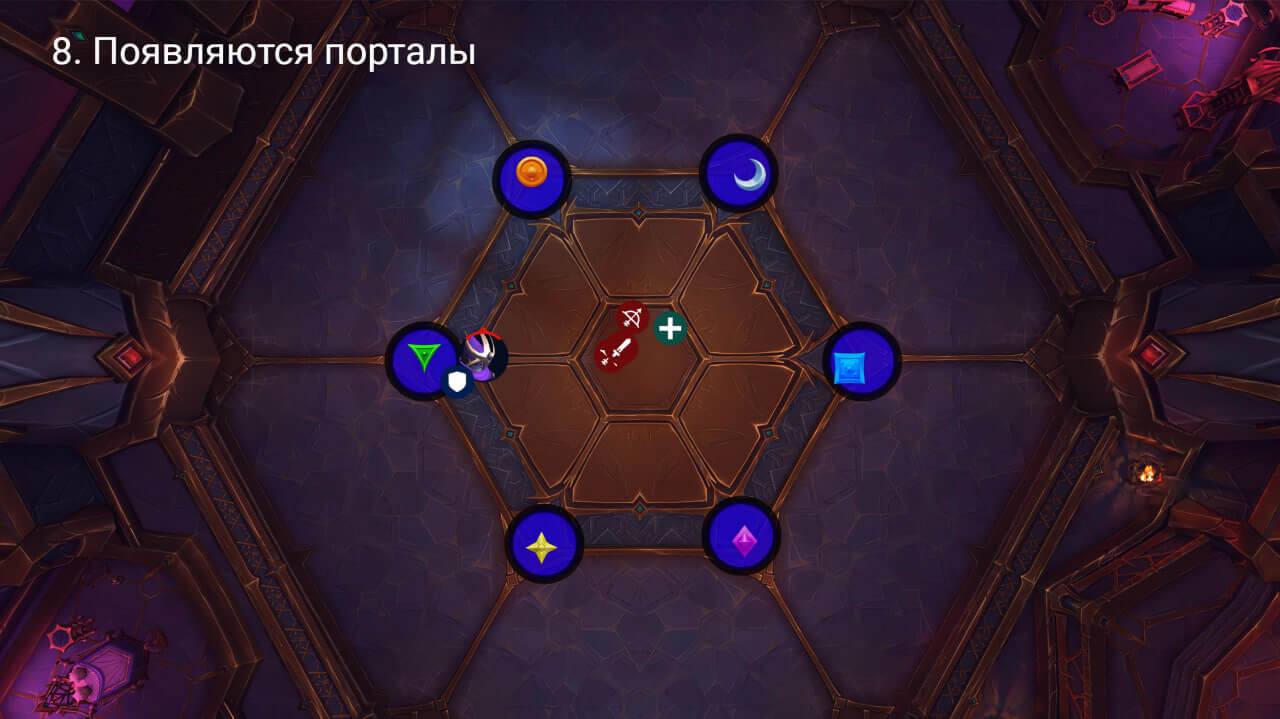
- Mythic: The battle begins with the appearance of five portals and a counter-portal.
Tactics (briefly):
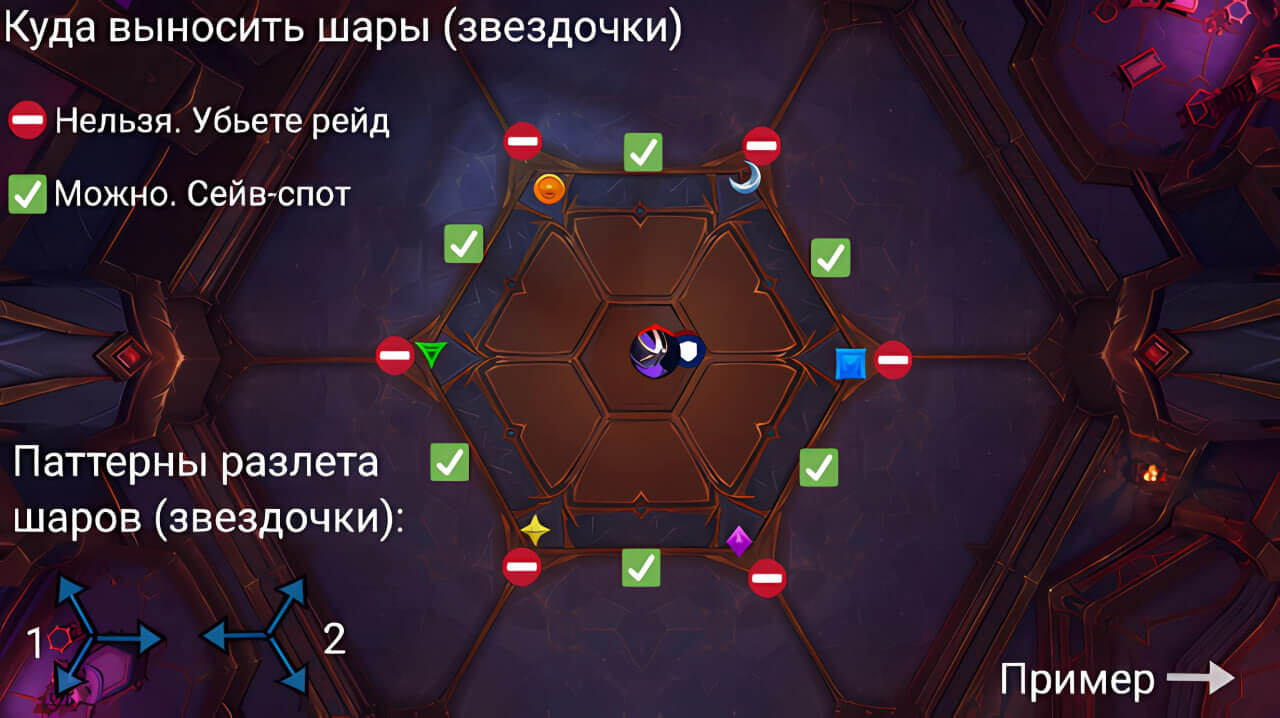
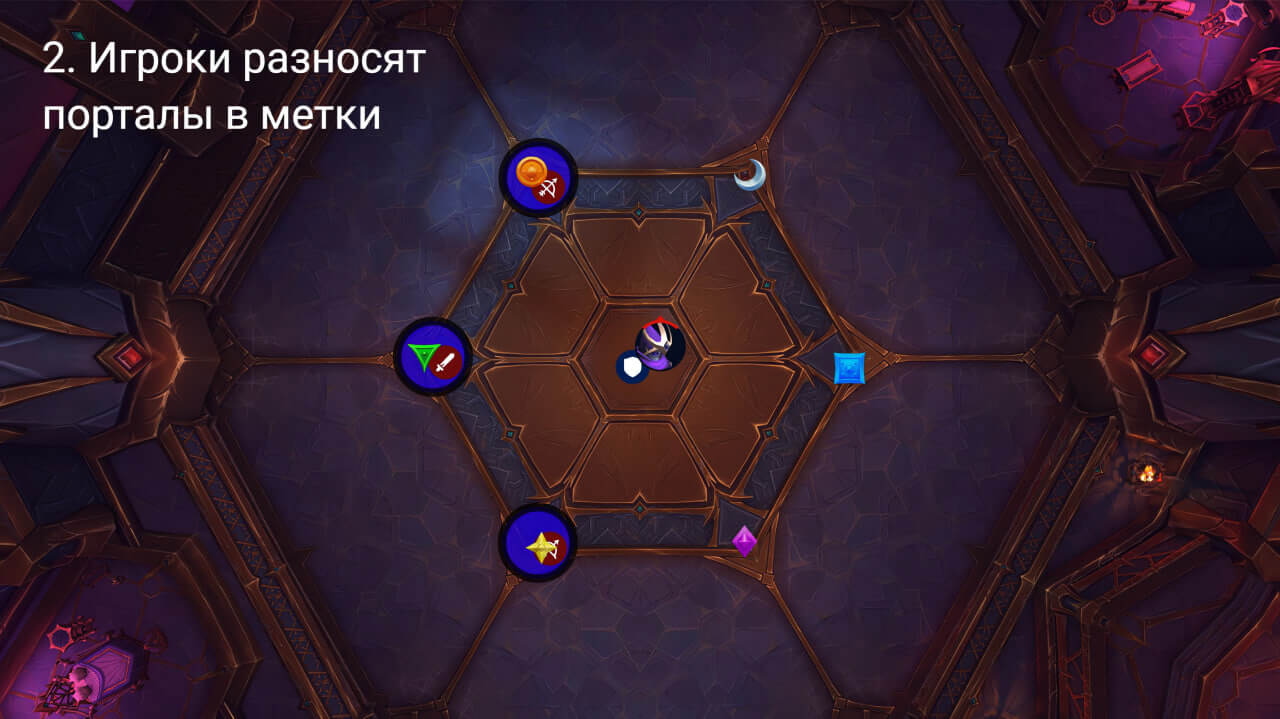
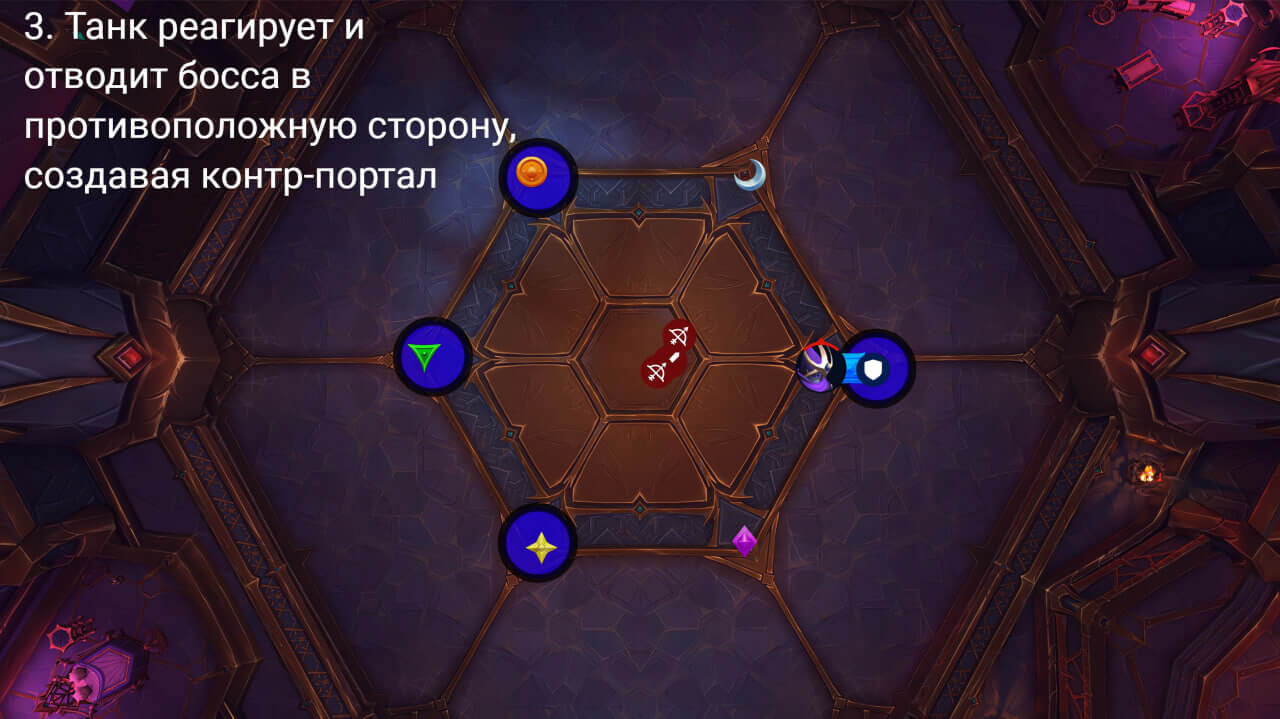
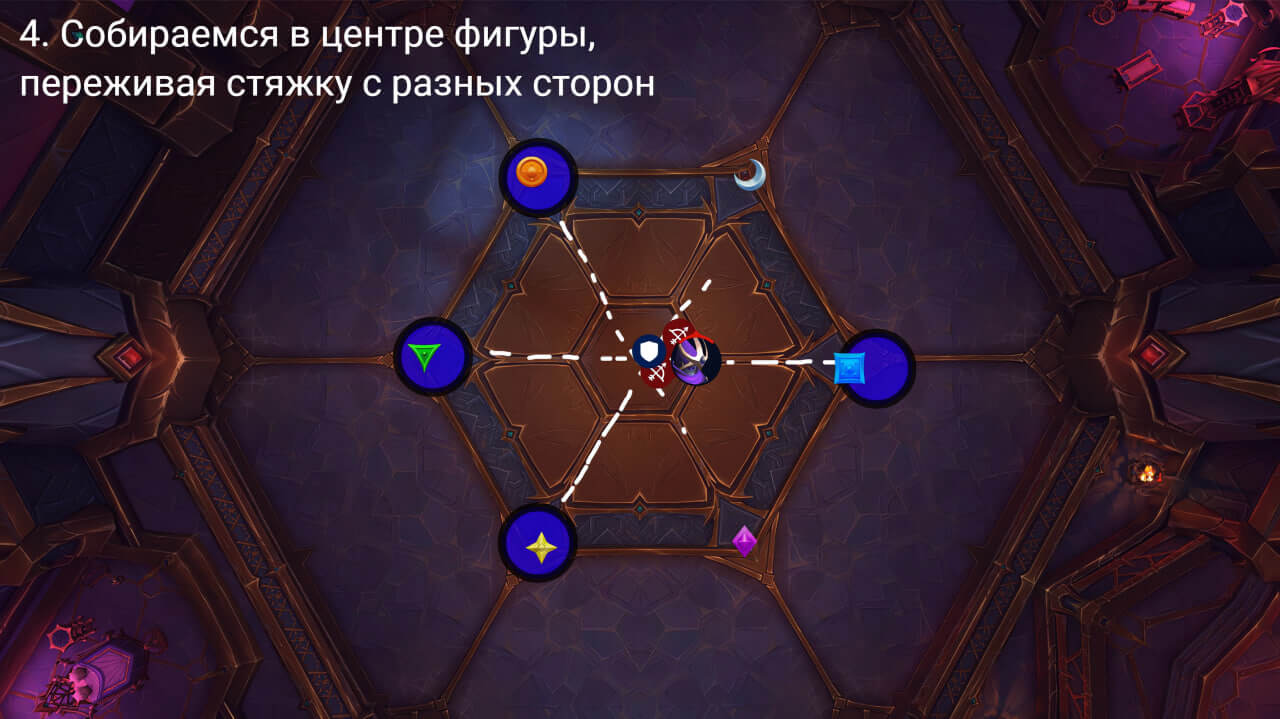
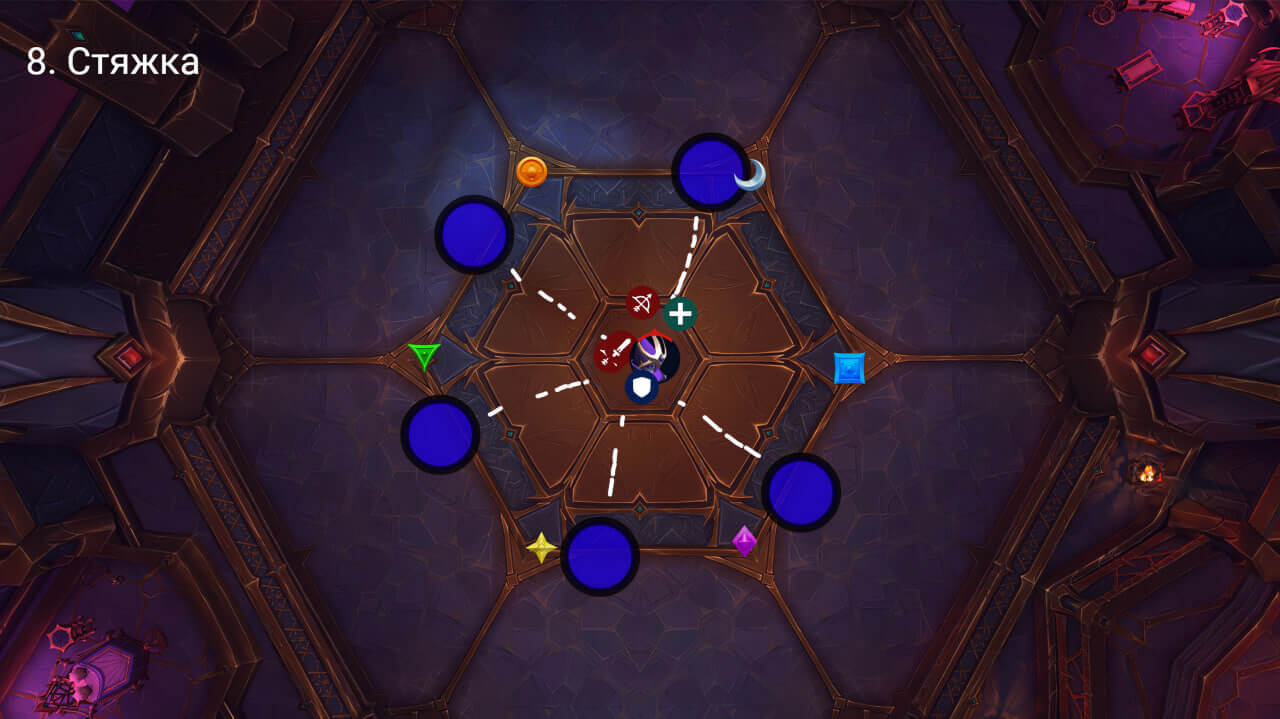
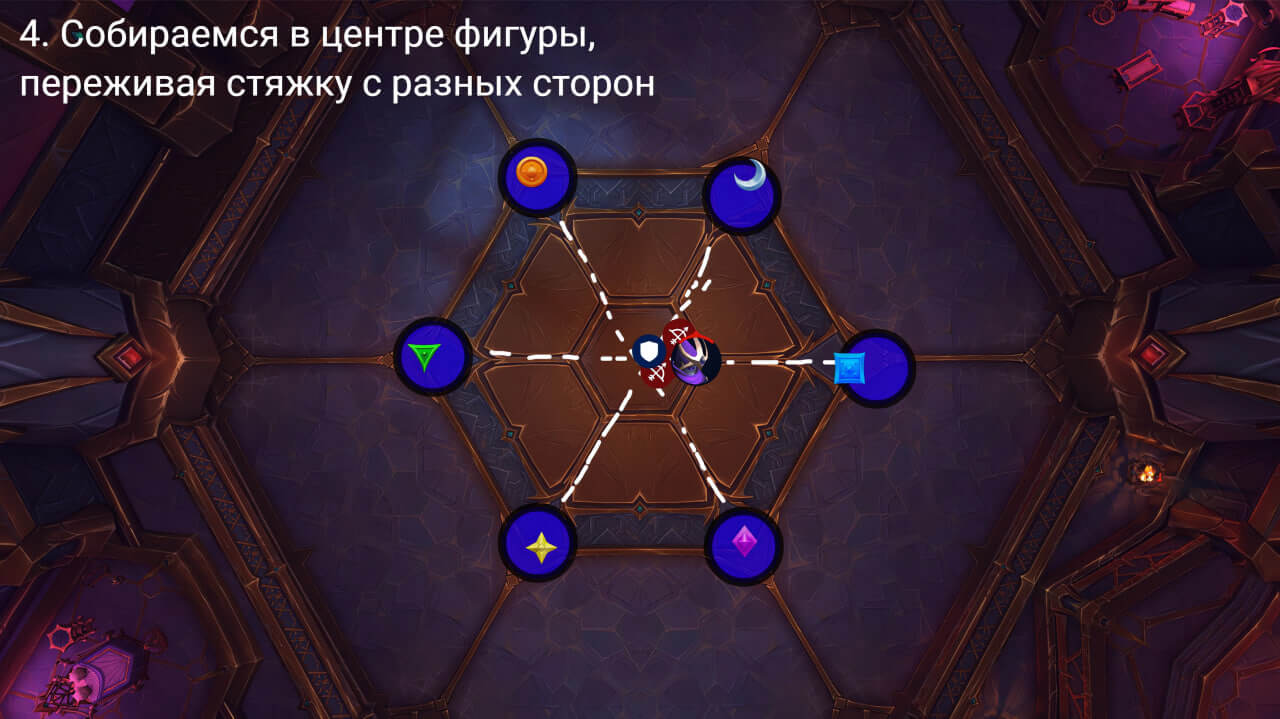
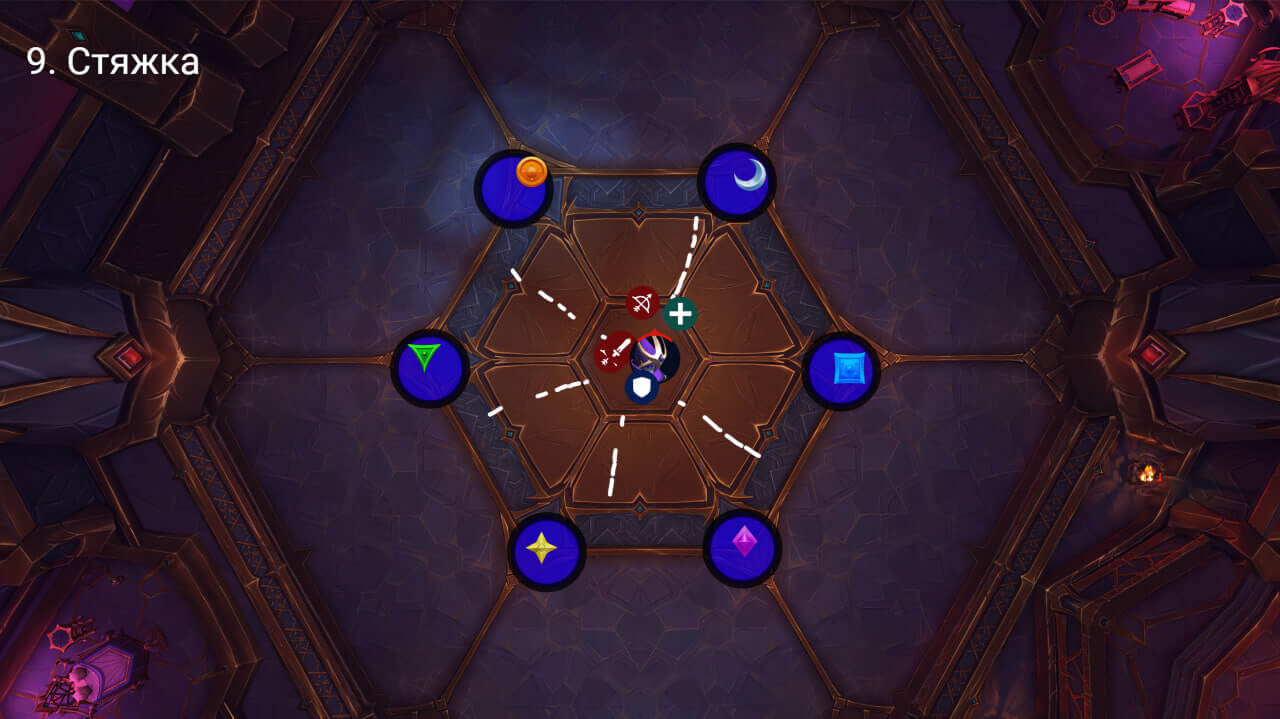
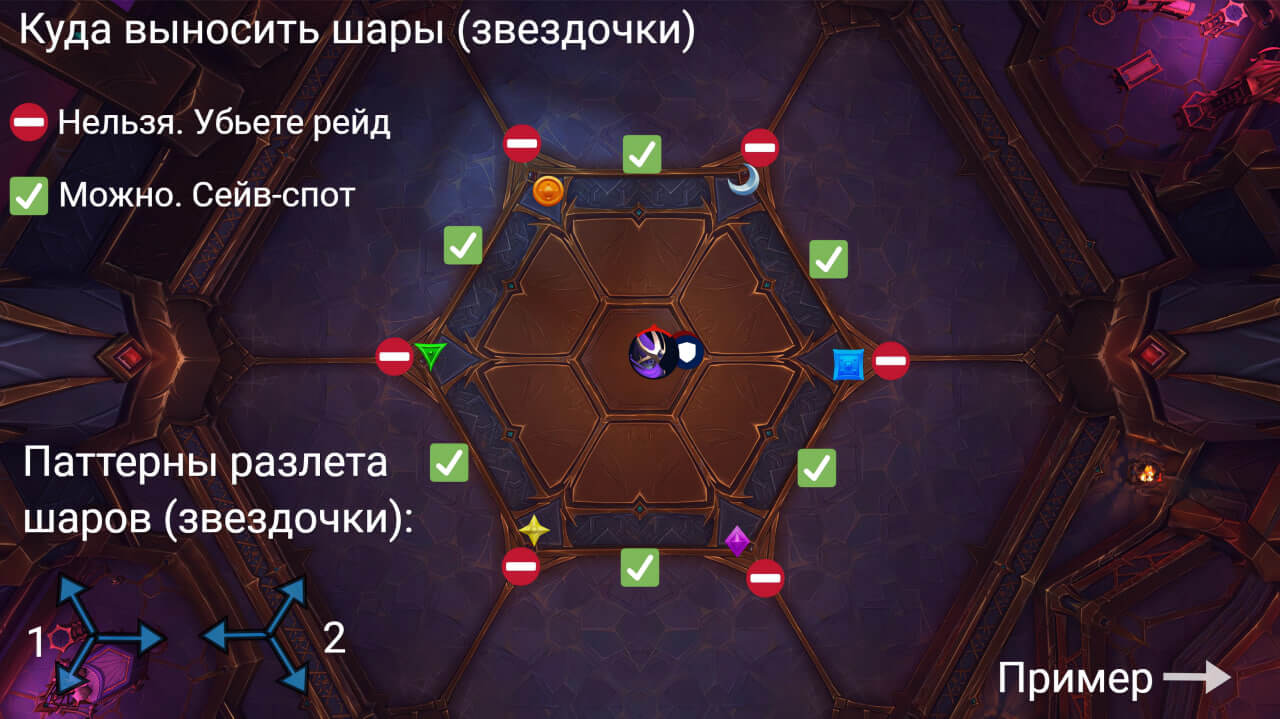
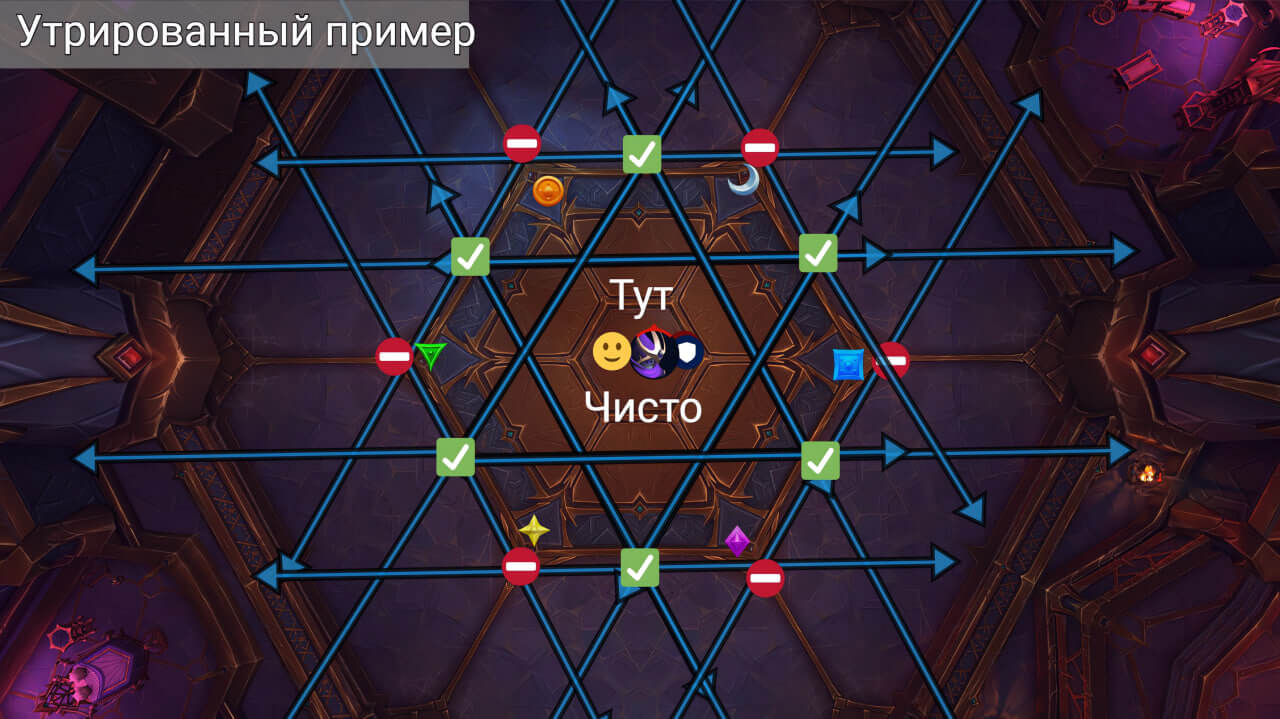
Place Void Zones in pre-designated locations. In addition to these Void Zones, one Void Zone will be on the tank. The tank should place the boss so that raid members can position themselves roughly midway between all Void Zones. Each Void Zone has a pull to it. If done correctly, you will be pulled in different directions, but eventually you will be able to stay in place and safe. Otherwise, you may get sucked into one of the Void Zones if you fail to stand in the geometric center between them.
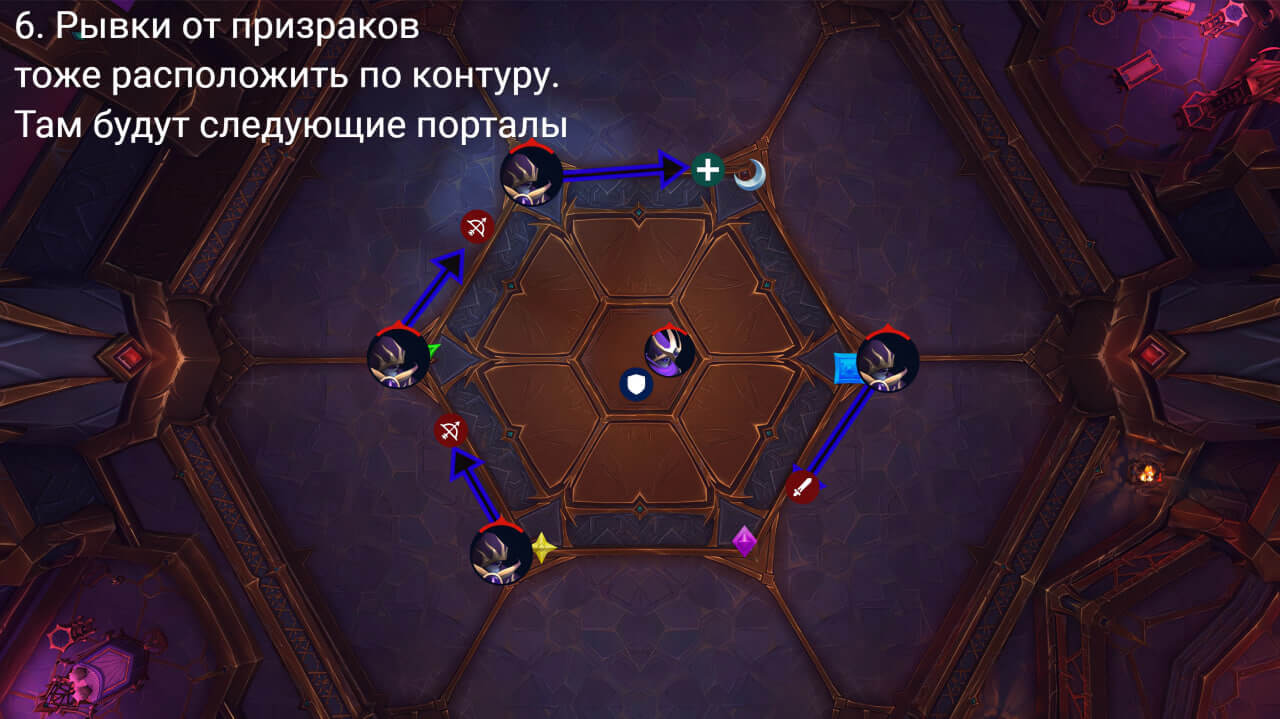
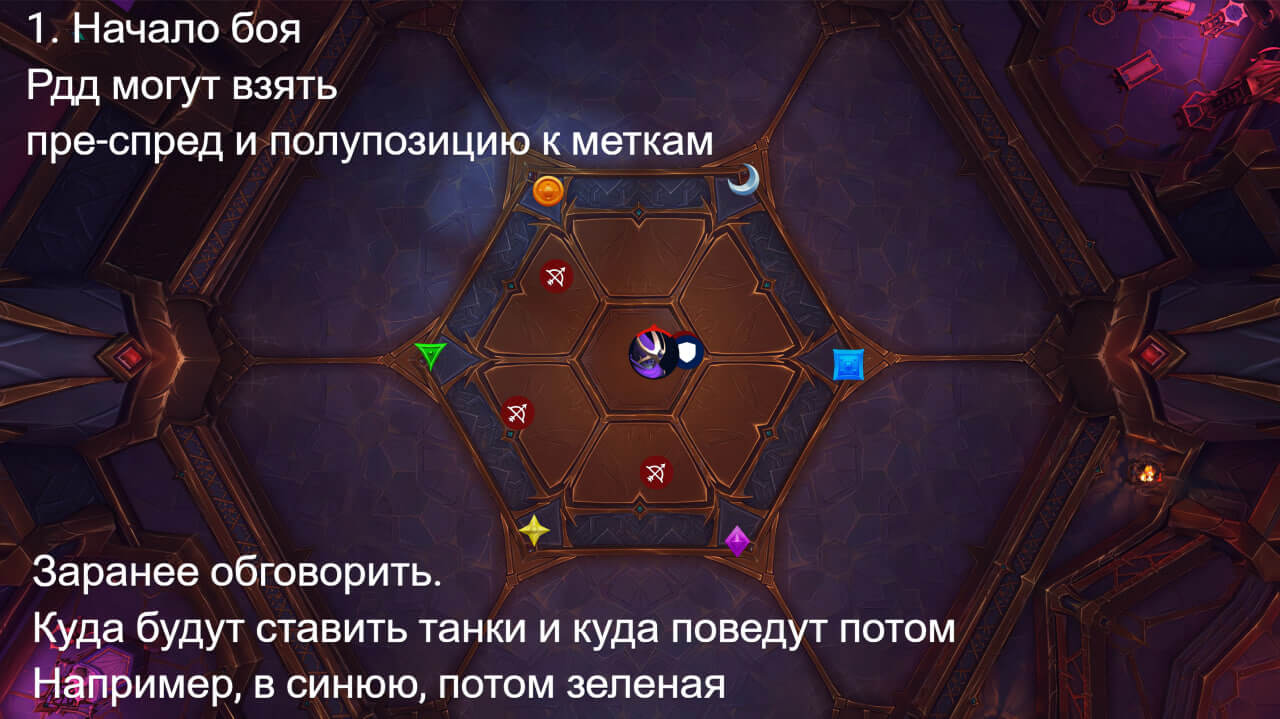
Place arrows around the perimeter, as new portals will appear from them. With small stars, move away from other members of the raid.
Avoid all other mechanics, dodge and minimize the damage you take.
Positioning (briefly):
 |
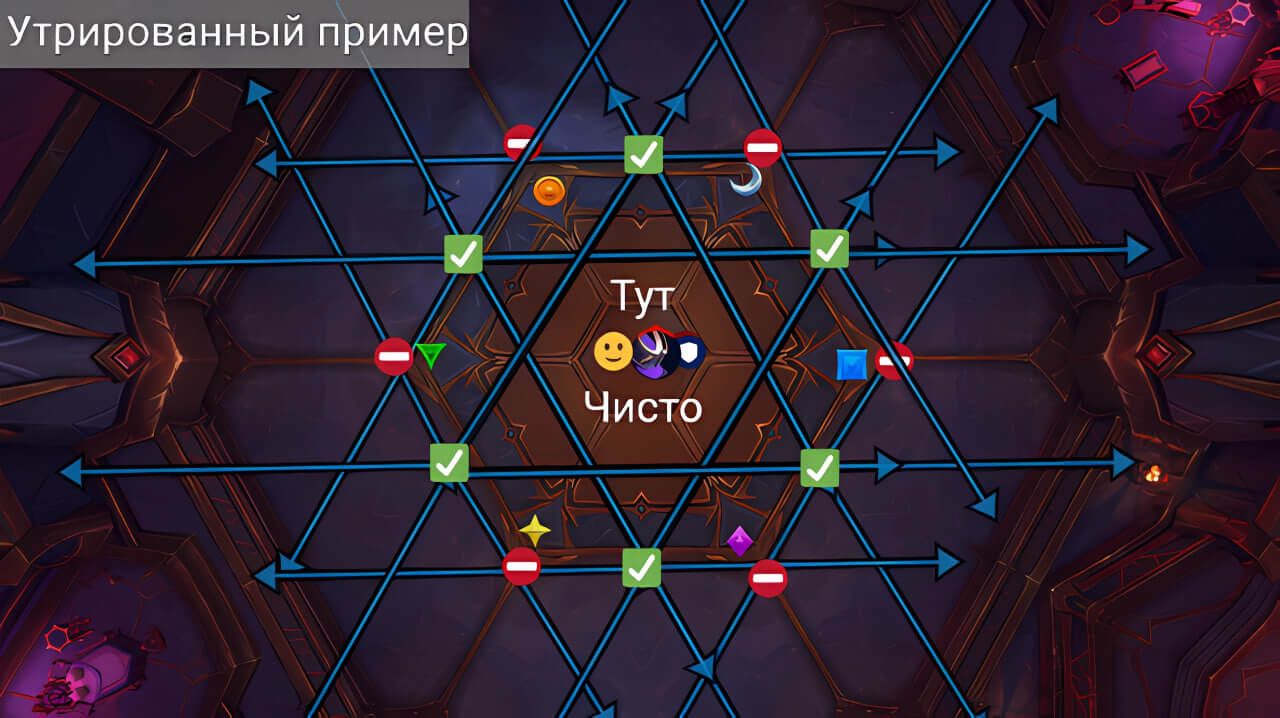 |
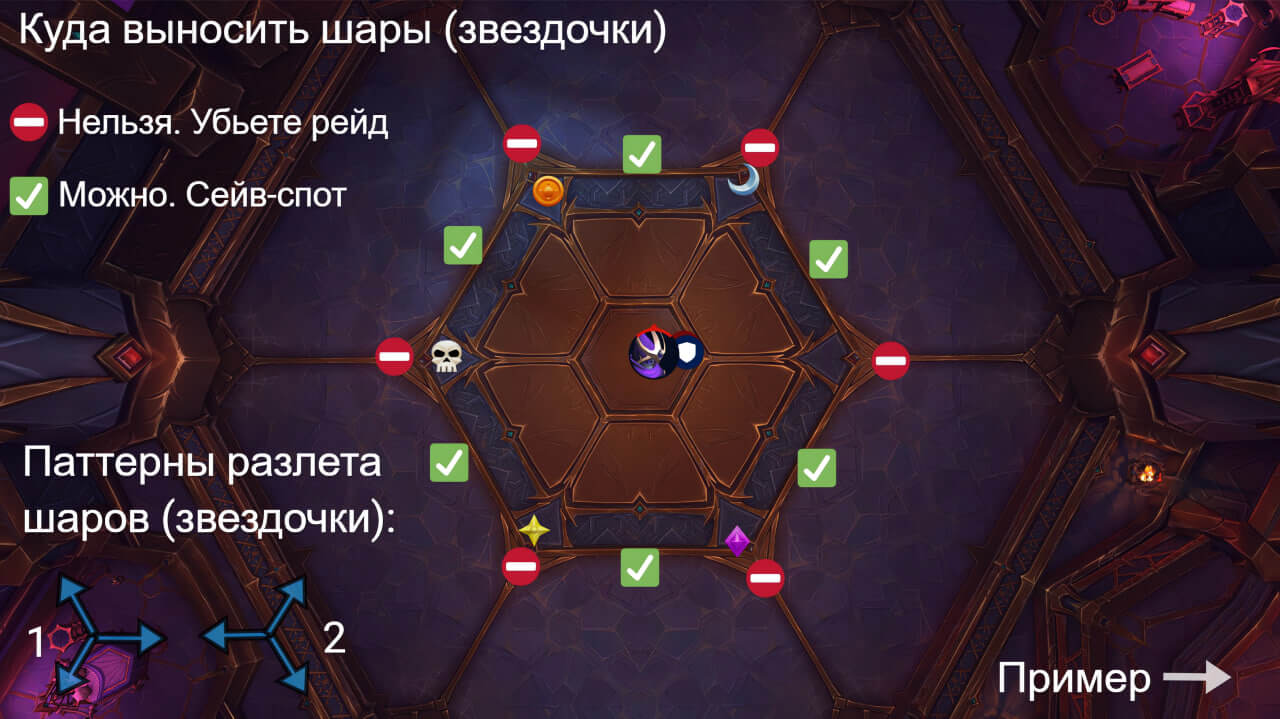
| ⛔ — You cannot take orbs (stars) into these areas, or you will kill raid members. ✅ — You can take orbs (stars) to these locations, they are safe zones. |
|
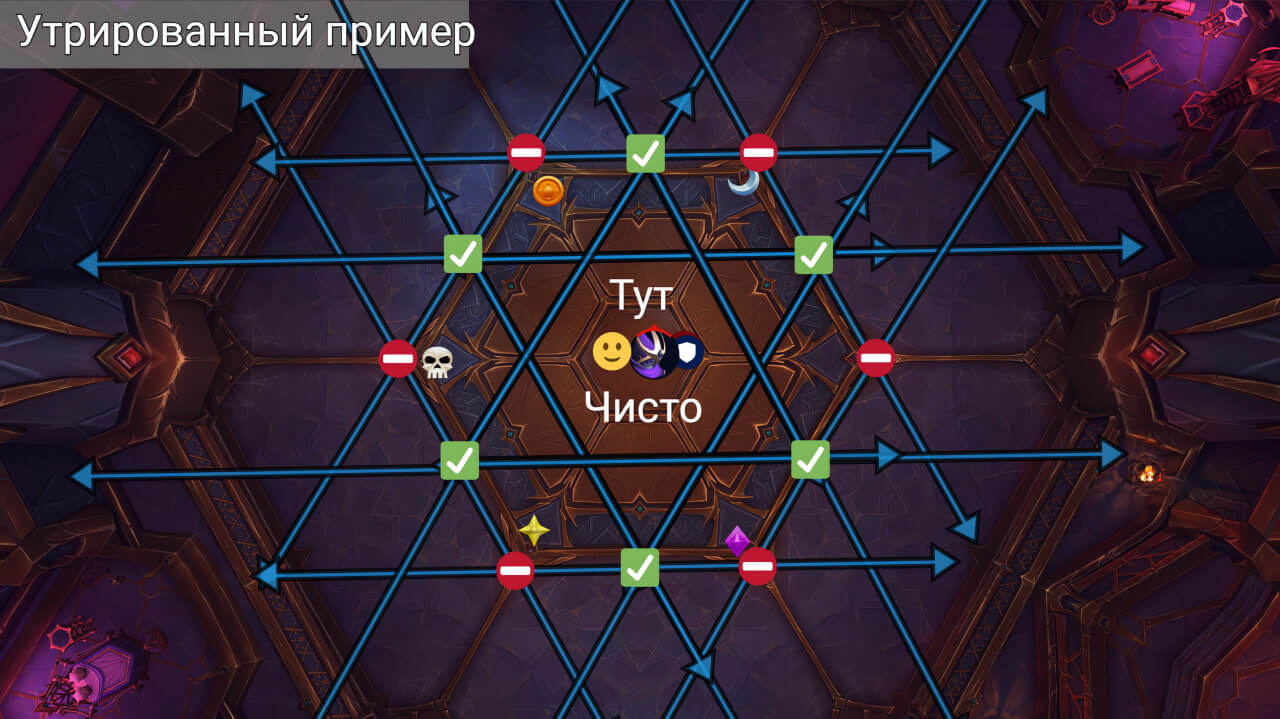
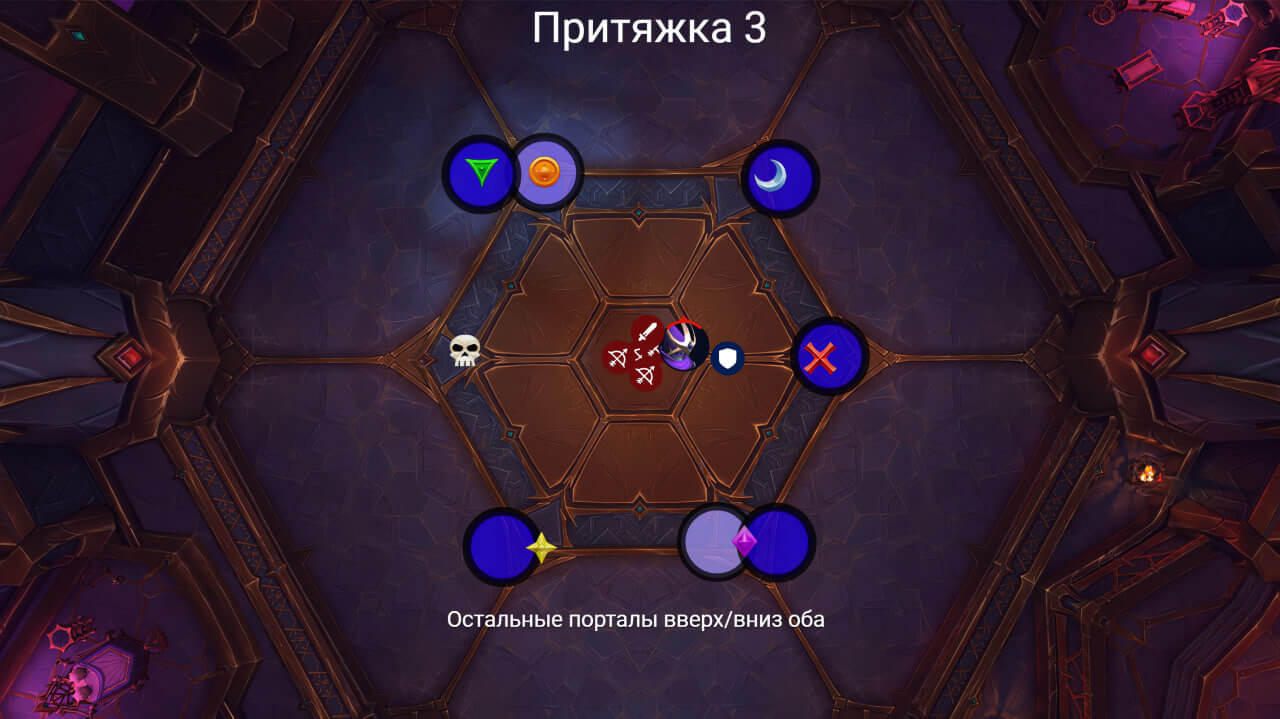
At the very bottom of the guide, there are images with examples of correct positioning for Heroic (HC) and Epochal (Mythic) difficulty. Be sure to familiarize yourself with them - this information will simplify the battle and will be extremely useful!
Boss Abilities |
||
Name of ability |
ID |
What to do? |
Phase 1 |
||
| Assassination | 436867 | A ring will be placed on you - it is a phantom. Take it along the contour. After it disappears, a phantom will appear and a portal will form under it. Beams will also be emitted from these phantoms. |
| Queensbane | 437443 | After the portals and arrows appear, a debuff in the form of a three-pointed star is applied. When it ends, orbs erupt in three directions. Do not rush back to the raid to avoid accidentally hitting other players. Detailed maps with designated safe zones are published below. |
| Dark Viscera | 439409 | Dodge the orbs. If you catch a orb, another star will immediately appear from you, releasing new orbs. |
Nether Phantom |
||
| Nether Rift | 437620 | Void Zone appears on players and forms a portal when it falls. It is necessary to mark the zones. |
| Atomized | 437786 | One-shot in portals. |
| Nexus Daggers | 439576 | Phantom forks, appear on the ground. Select dodge. |
| Stalking Shadows | 436950 | It is necessary to actively heal members of the raid. If necessary, use mass healing and defense abilities. |
| Death Maksk | 448364 | Not all phantoms have masks. In Phase 1, 3 out of 5 phantoms will have masks, in Phase 2, 4 out of 5 phantoms will have masks, and in Phase 3, all 5 phantoms will have masks. It is important to avoid a situation where three masks fly through the boss at the same time. Accordingly:
|
| Death Cloak | 447174 | Arrows need to be drawn through the boss to create usable portals. Arrange them in such a way that the portals become usable afterwards. |
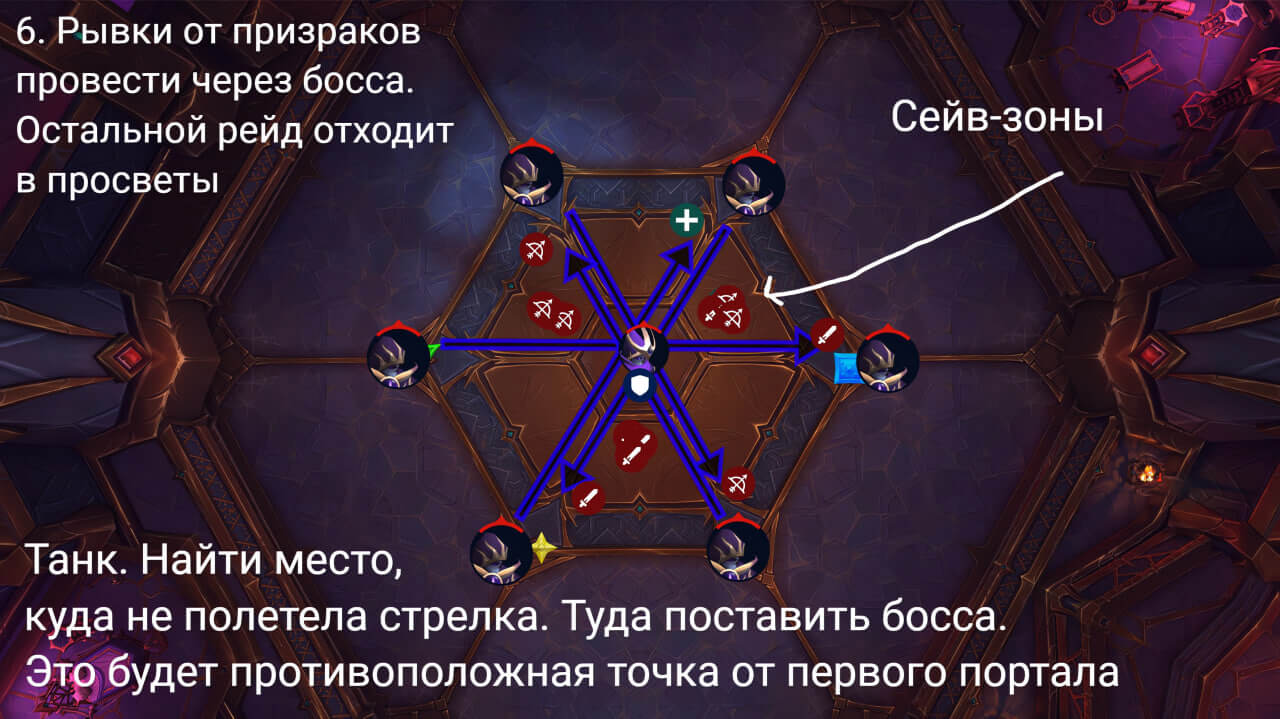
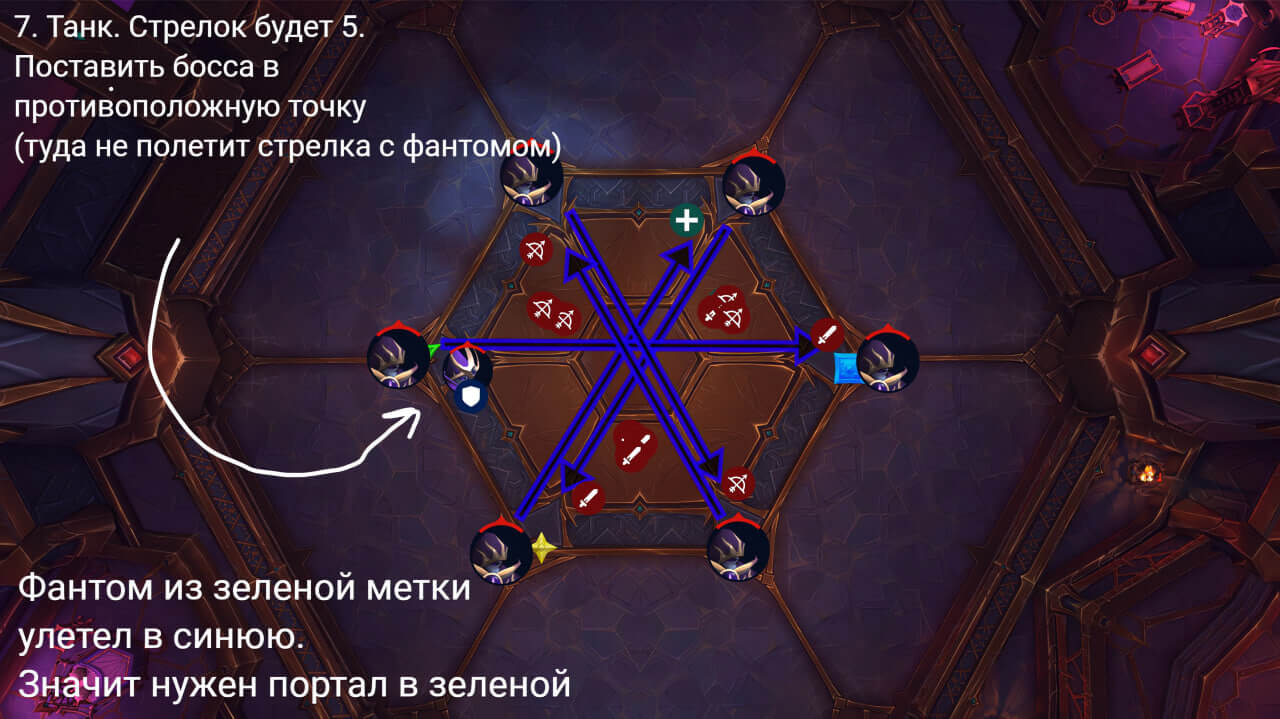
| Twilight Massacre | 438245 | Big arrows. Take them out of the raid (you will have a red mark). Mythic: guide the arrows through the boss. The arrows start at the portal and are the phantom's charge. A new portal will appear at the phantom's arrival point. Position the arrows correctly to ensure optimal portal placement. |
| Nether Rift | A portal will appear at the phantom's stopping point. | |
| Atomized | 437786 | One-shot in portals. |
| Nexus Daggers | 439576 | Players must dodge. |
| Reaper | 436749 | Players' health must not drop below 10% or the boss will execute them. Make a WA for yourself. |
| Void Shredders | 440377 | Tank: 4 quick hits to the active tank. It is recommended to use your own defense abilities. Tanks must change after each combo. |
| Chasmal Gash | 440576 | Tanks must change. |
Phase 2 (Transitional) |
||
| Starless Night | 435414 | Healers must actively heal raid members from damage for 24 seconds. |
| Eternal Night | 442278 | The third transitional phase is the enrage. |
| Regicide | 435486 | These mechanics are similar to those found in the battle with Fyrakk. |
| Eclipse | 434645 | It's flooding the floor. |
| Reaper | 436749 | Players' health must not drop below 10% or the boss will execute them. Make a WA for yourself. |
Useful information for players
For Tanks:
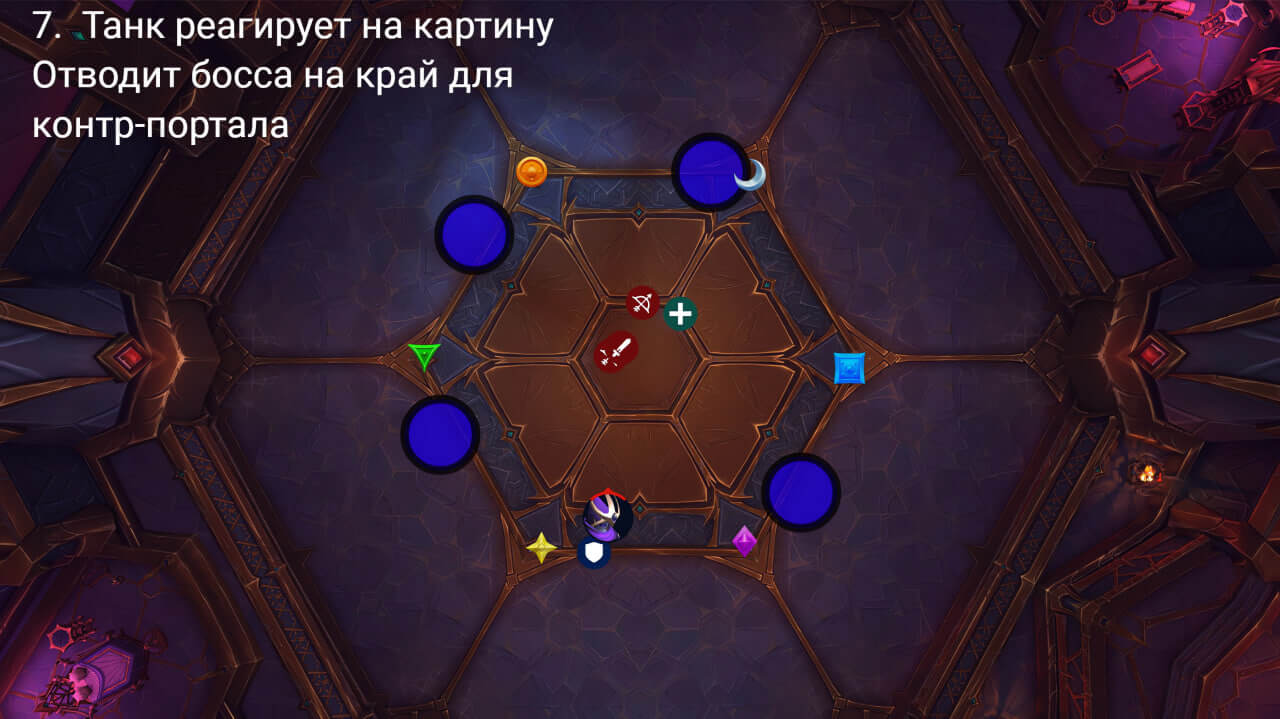
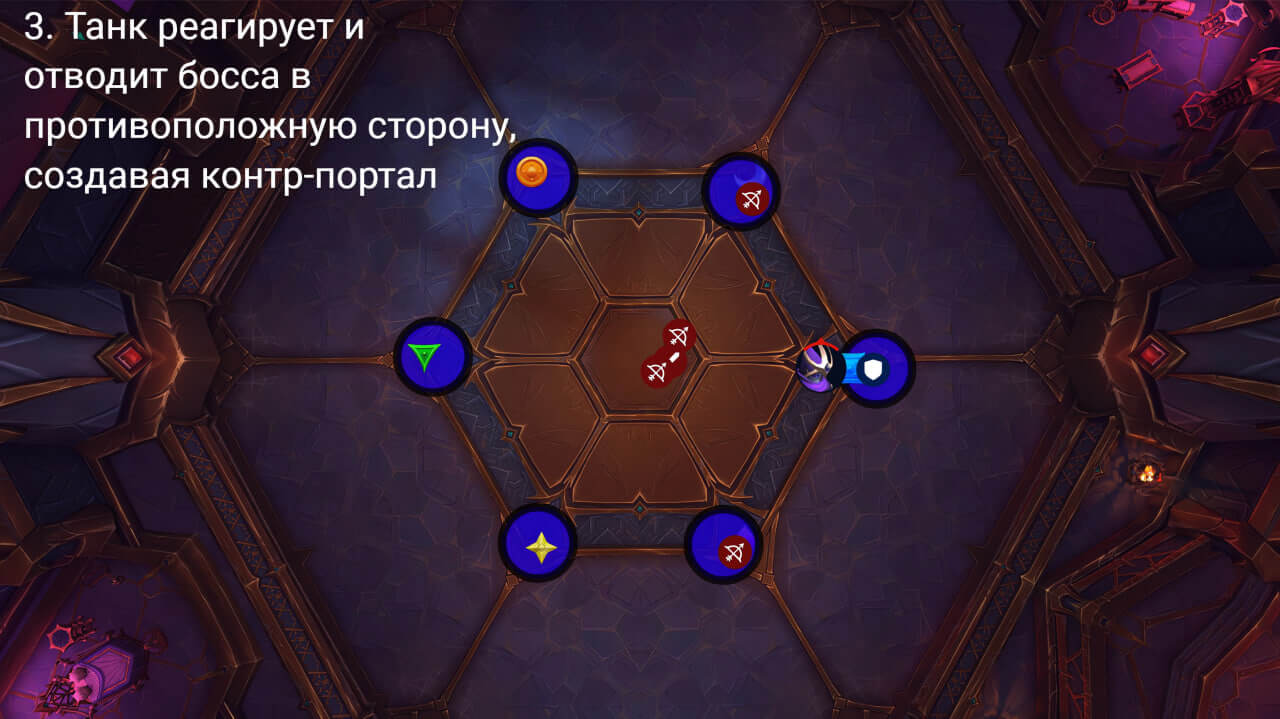
- As soon as players trash the portals, immediately take the boss to create a counter-portal. After that, move it to the center of the figure.
- The second tank will need to position the boss, orienting itself around the phantoms (portals will appear underneath them). The counter-portal should also be placed, focusing on the phantoms.
- Four hits, use defensive abilities towards the end. Change tanks after each combo.
- Watch out for phantoms flying by. You will need to move the boss to the sixth point immediately.
For Healers:
- Healing is not required at the beginning of combat, so focus on dealing maximum damage so you don't go idle.
- The main damage is dealt by Phantom Presence, which deals constant periodic damage.
- Use the target switch to find characters that are affected by Queensbane's negative effect and focus on healing them.
For DPS:
- This boss is a DPS check.
- There are no special phases, so use bursts from the first second of the fight and then as they recover.
- UPD: No damage to shields.
Lifehacks:
- If the portals are placed correctly, you may not even use the movement keys.
- Queensbane should not be placed on the main axes of the room. Place it in the center of the sides of the hexagon shown on the floor. After placing the portal, stand on the center side of the hexagon and then return to the raid.
Boss timers
Heroic (HC) |
Mythic |
||
| {time:00:10} | 3 portals | {time:00:10} | Portals |
| {time:00:22} | Attraction | {time:00:19} | Masks |
| {time:00:34} | Arrows | {time:00:22} | Attraction |
| {time:00:56} | Attraction | {time:00:34} | Arrows |
| {time:01:04} | Arrows | {time:00:56} | Attraction |
| {time:01:31} | Transitional phase | {time:01:04} | Arrows |
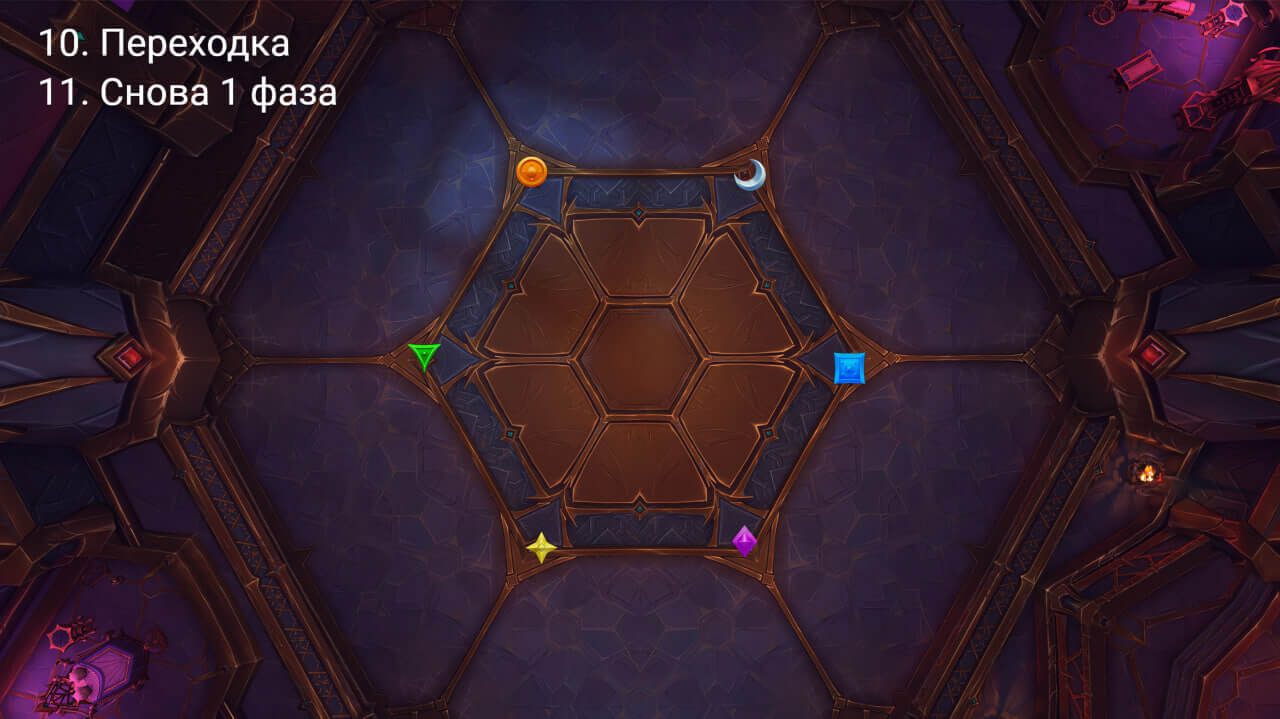
| {time:02:10} | 4 portals | {time:01:31} | Transitional phase |
| {time:02:22} | Attraction | {time:02:10} | Portals |
| {time:02:34} | Arrows | {time:02:22} | Attraction |
| {time:02:56} | Attraction | {time:02:34} | Arrows |
| {time:03:04} | Arrows | {time:02:56} | Attraction |
| {time:03:31} | Transitional phase | {time:03:04} | Arrows |
| {time:04:10} | 5 portals | {time:03:31} | Transitional phase |
| {time:04:22} | Attraction | {time:04:10} | Portals |
| {time:04:34} | Arrows | {time:04:22} | Attraction |
| {time:04:56} | Attraction | {time:04:34} | Arrows |
| {time:05:04} | Arrows | {time:04:56} | Attraction |
| {time:05:31} | Enrage | {time:05:04} | Arrows |
| {time:05:31} | Enrage | ||
Positioning
To read the text written on the pictures, move the mouse cursor over the picture and a description in your language will appear.
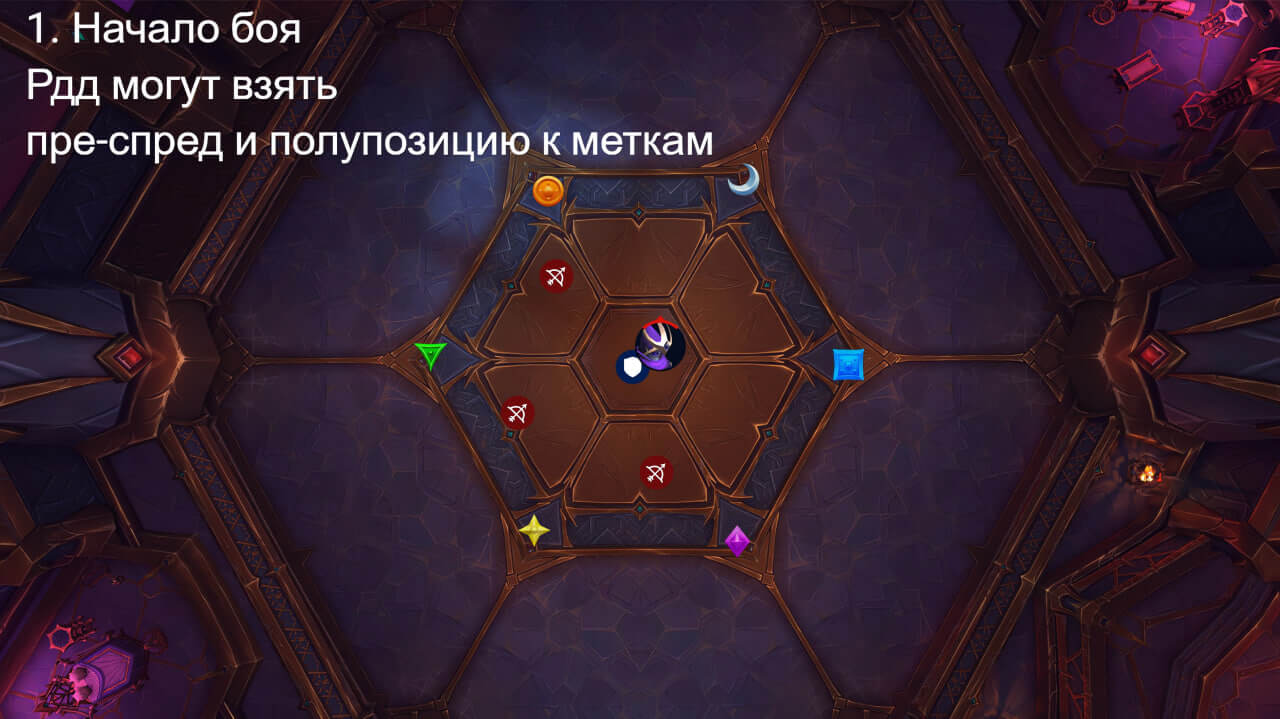
Mode: Heroic (HC)
The images show examples of positioning, and describe the steps that must be performed in a specific sequence to defeat the boss in the heroic difficulty mode..
 |
 |
 |
 |
 |
 |
 |
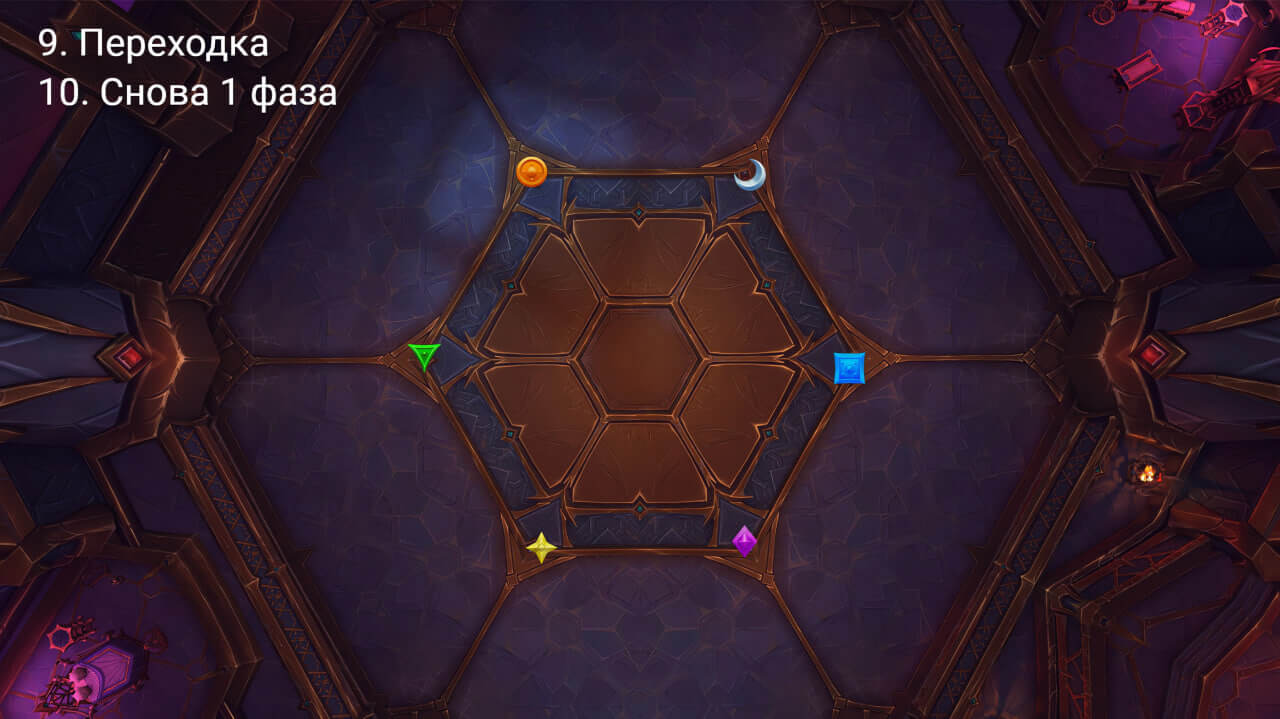 |
Mode: Mythic [Method #1]
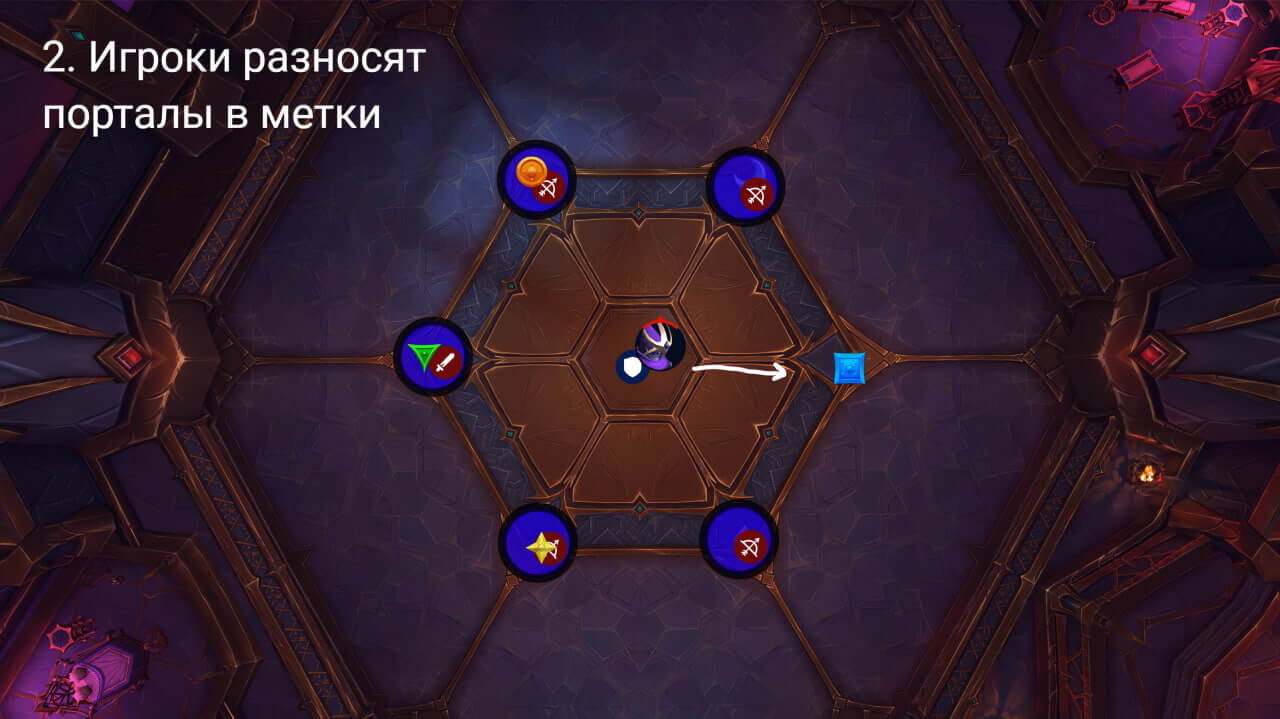
The images show examples of positioning, and describe the steps you must follow in a specific sequence to defeat the boss in Mythic difficulty mode.
 |
 |
 |
 |
 |
 |
 |
 |
 |
 |
 |
Can't handle this or other bosses? Write to us at the link: “Quick Raid” and we will solve any of your problems in no time. |
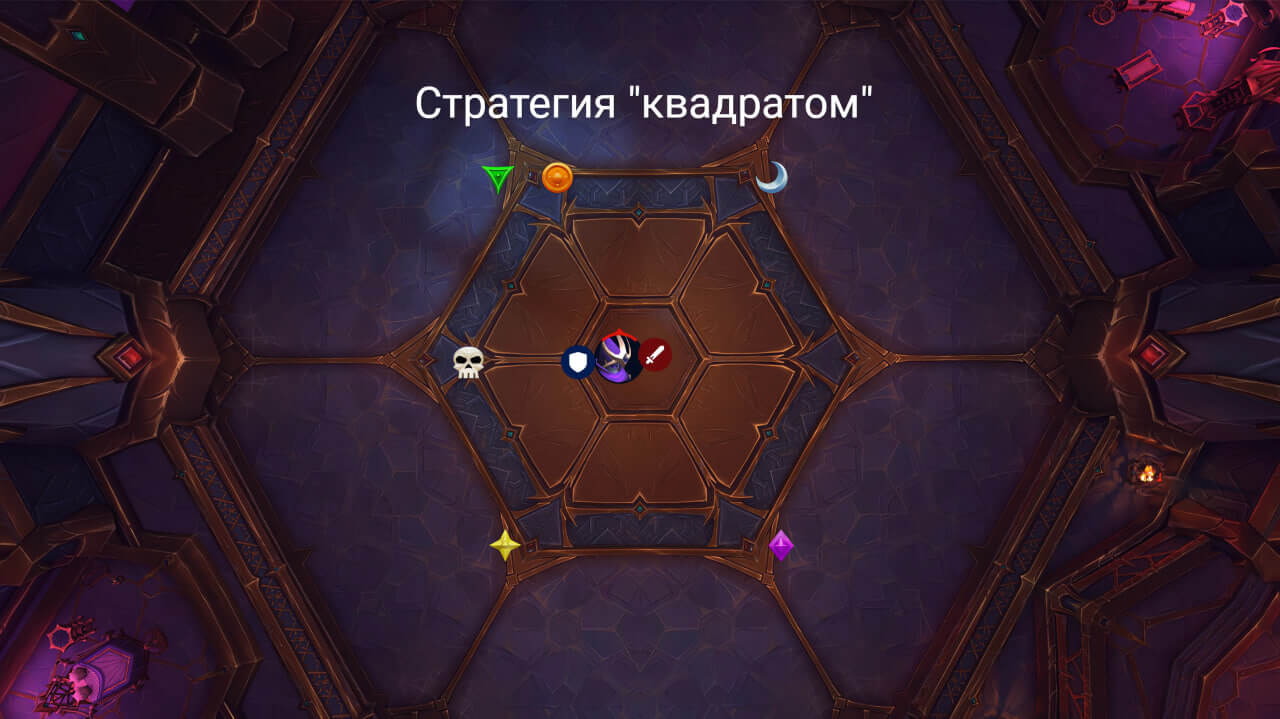
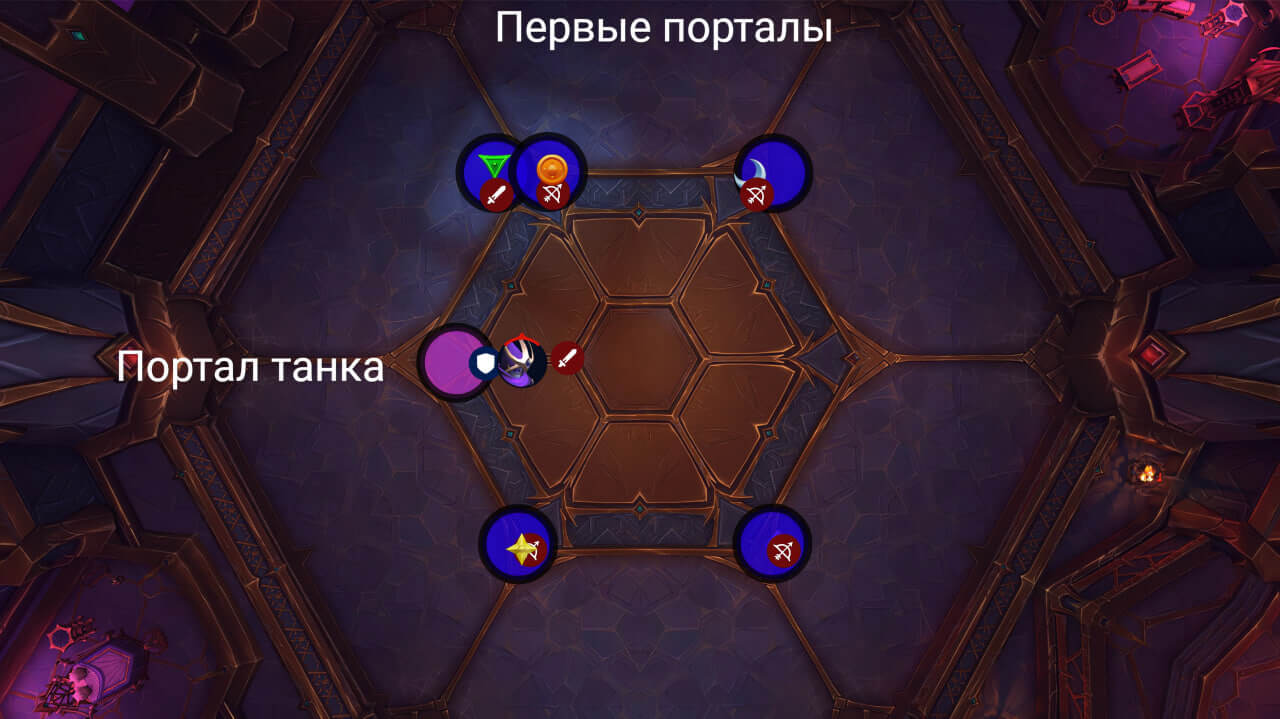
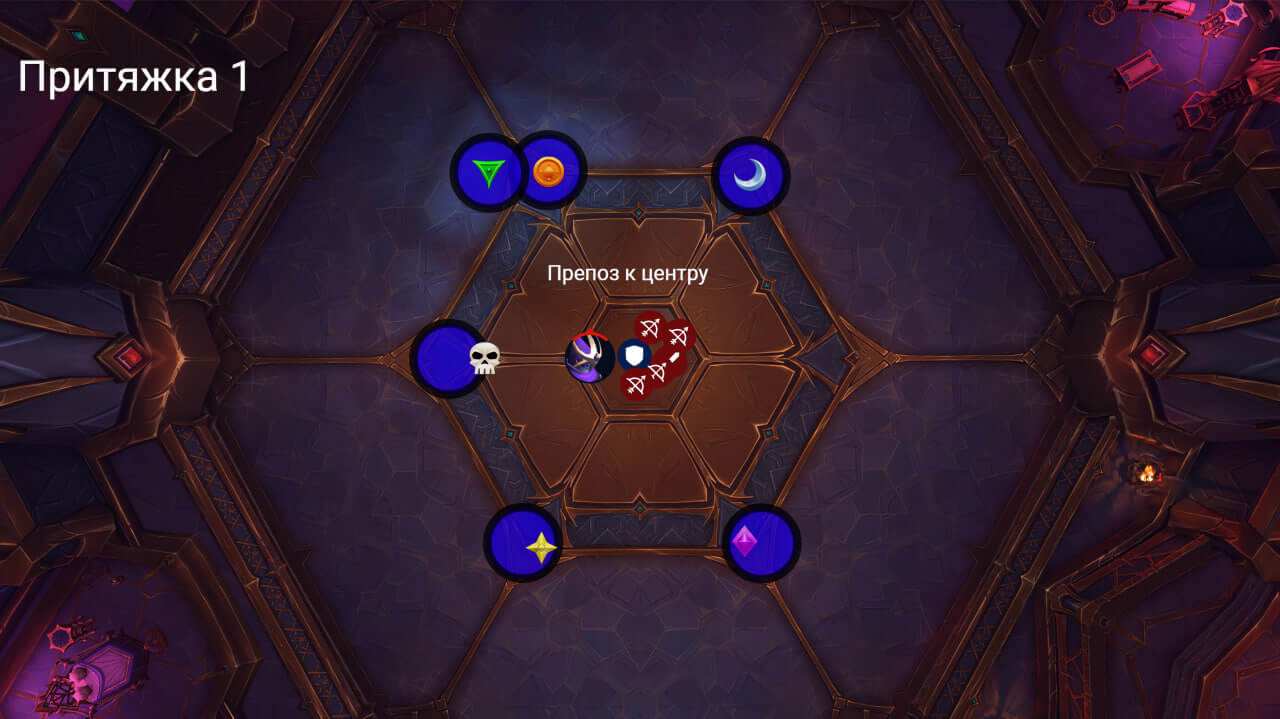
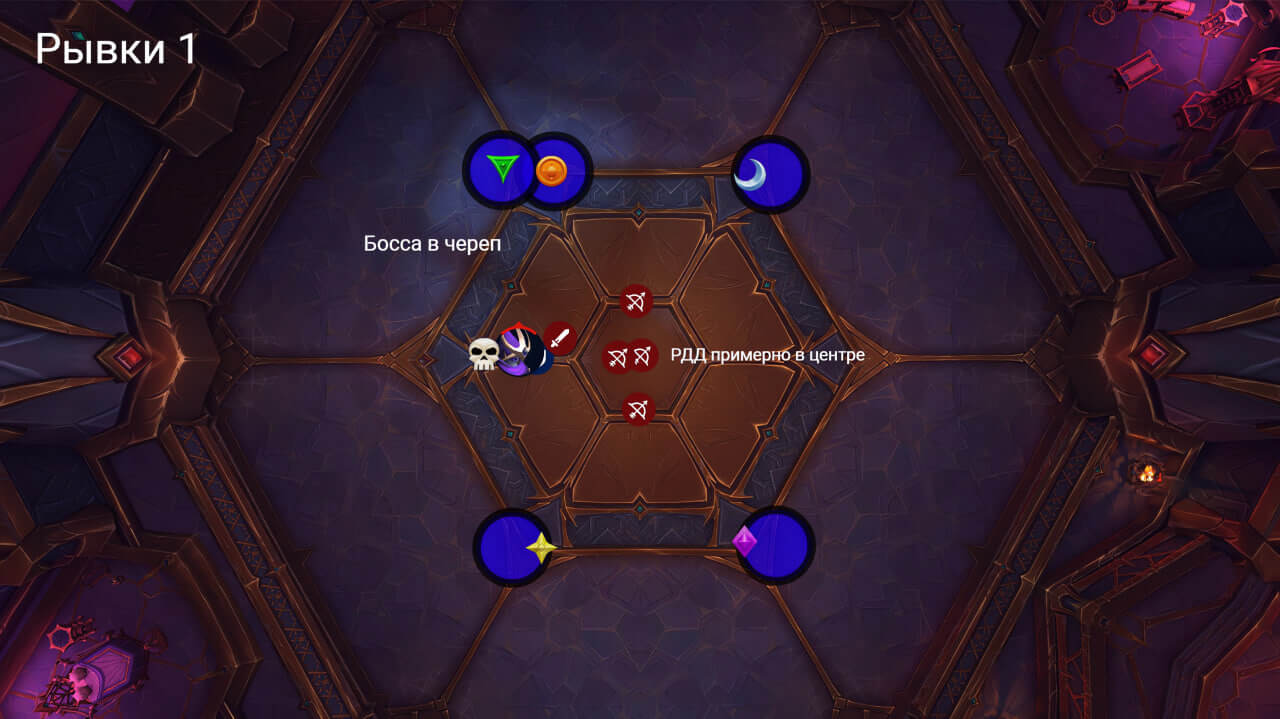
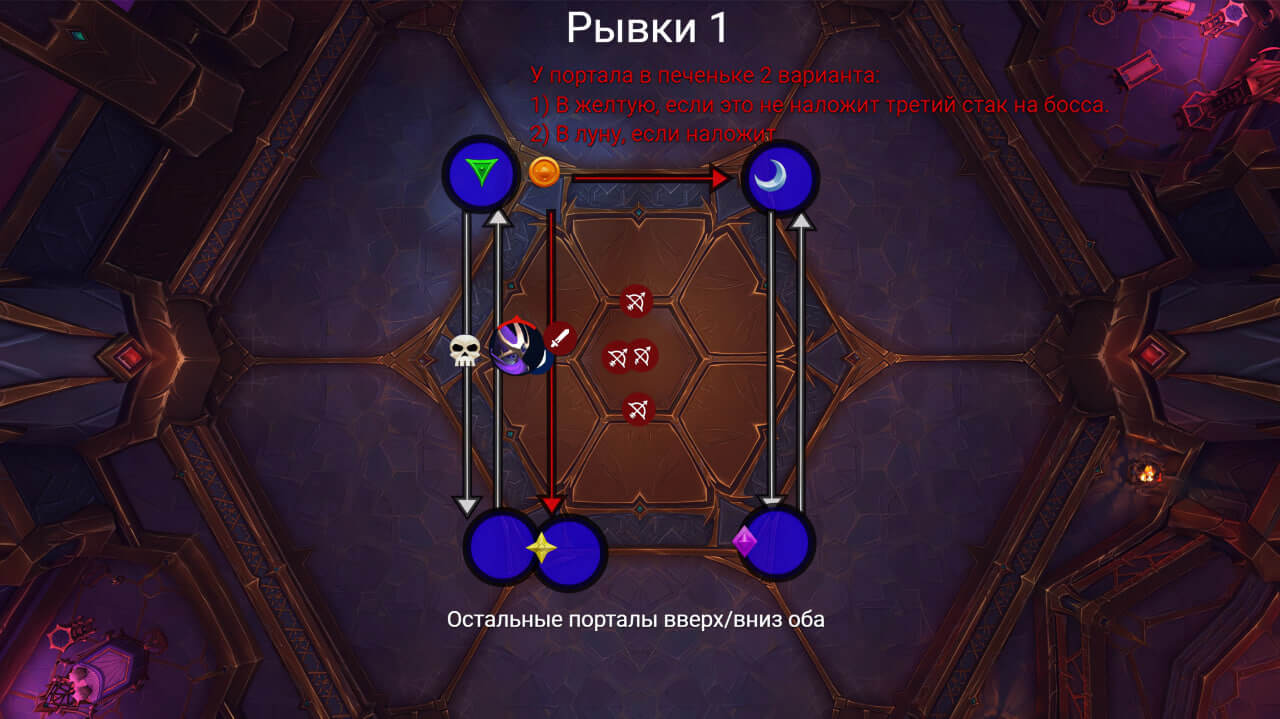
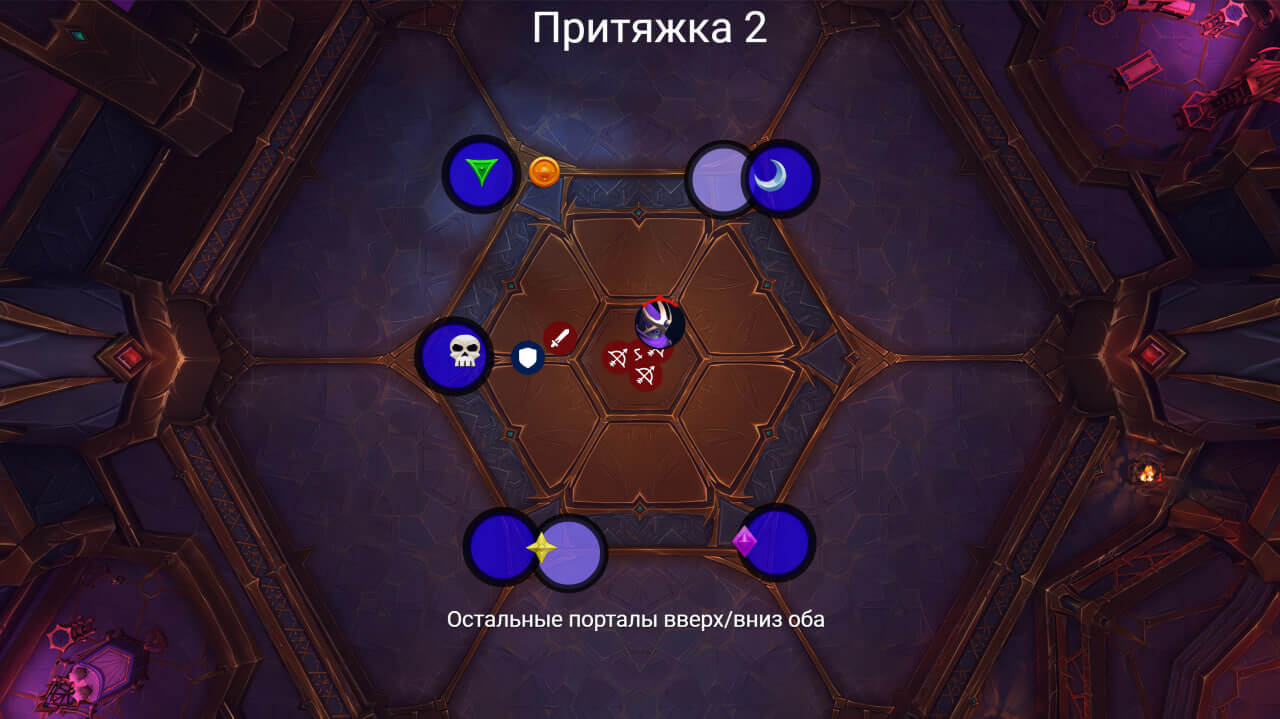
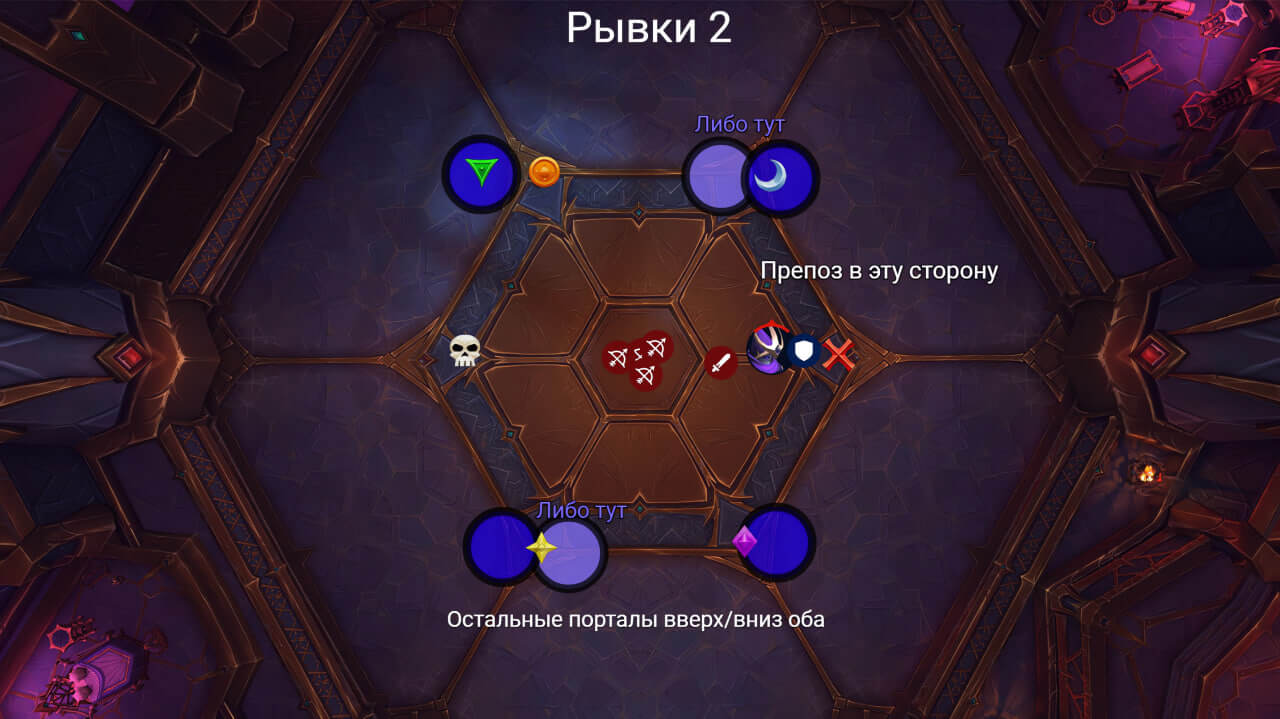
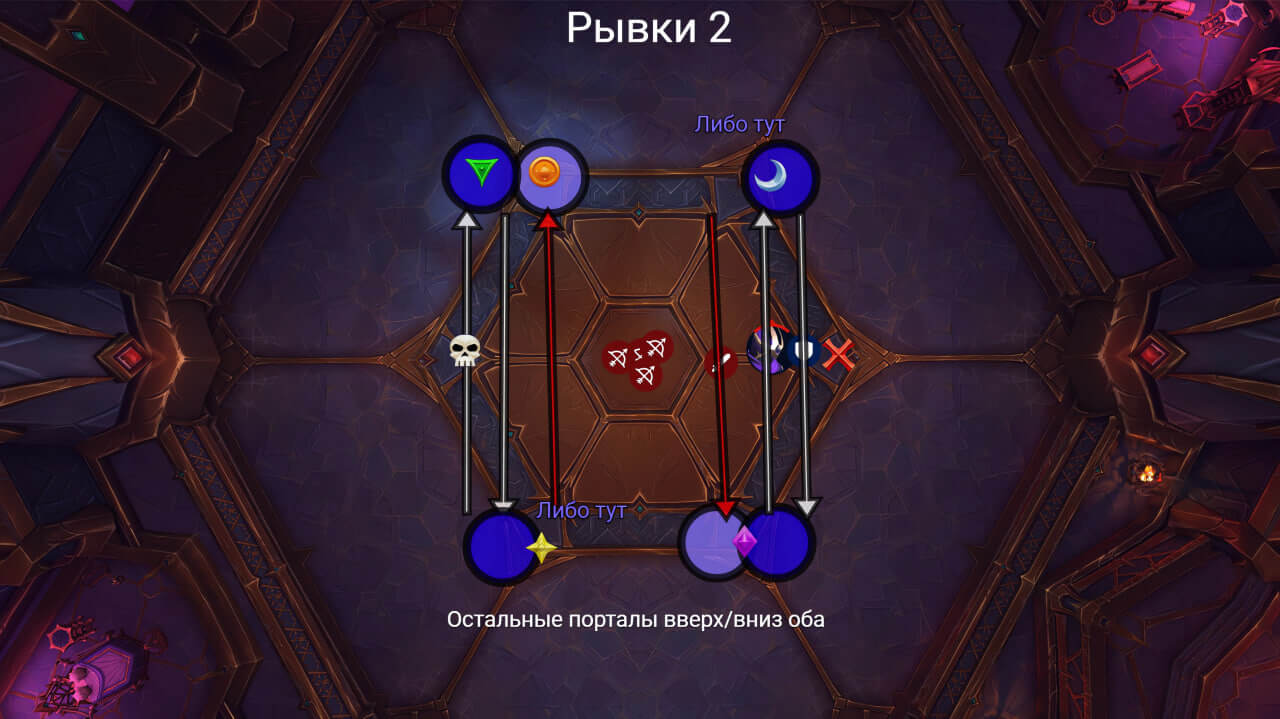
Mode: Mythical [Method #2] - Positioning “Square”
The images show examples of positioning, and describe the steps you must follow in a specific sequence to defeat the boss in Mythic difficulty mode.
 |
 |
 |
 |
 |
 |
 |
 |
 |
 |
 |
Want to defeat all the bosses quickly? Do it together with boosters from the RaidLine team. Book your place in the raid! |
Blog Tags
| 🔥 EXCLUSIVE WoW SERVICES – FAST & SAFE! 🔥 | ||||

Gold⚡ Instant Delivery 2-3 min Buy Now |

Raids⚔️ Start in 20-30 min Buy Now |
Mythic+💀 Any Difficulty Mode Buy Now |

PvP🏆 Play with Gladiators Buy Now |

Coaching🎮 Learn from real boosters Buy Now |
| ✅ 100% Safe – No Bots | ⭐ Trusted by 10,000+ Gamers | 🚀 Instant Delivery! | ||||

