Sennarth, the Cold Breath
General Information:
- On this boss, it is recommended to choose talents to maximize damage on one enemy (solo target).
- Mobs will appear during the battle, some of them are prioritized.
- Throughout the battle, there will only be two phases.
- Be sure to pay attention and keep in mind that this boss possesses Enrage.
- Bloodlust / Heroism - most logical to use at the beginning of the fight, so that the boss has as little health as possible by the Enrage phase. This is due to the fact that all your characters will be alive at the beginning of the fight, which in turn will help you deal as much damage to the boss as possible.
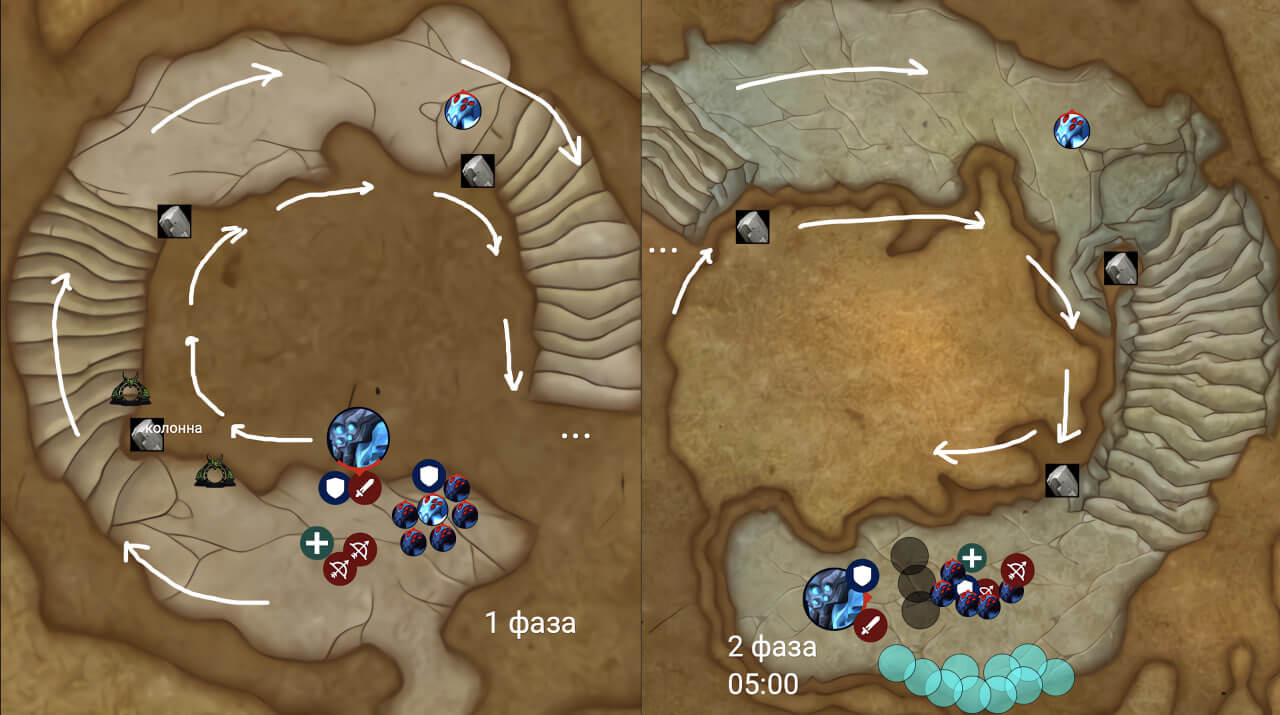
- The boss battlefield looks like a spiral staircase with platforms. The boss is suspended in the center over a cliff and is gradually pulled upwards. Raid members are almost constantly climbing up the spiral staircase. Take extra care during the climb, there will constantly be cliffs on all sides, and also remember that the floor is quite slippery.
- The main action during the battle with the boss is to lay out the web. This action must be performed in order to prevent your game character from sliding on platforms and ladders. Under the pull / push, you need to go into the web to get web effects. The web effects are cleared by blowing up spiders.
- The first phase will have 6 ties and the battlefield will have six columns, you can use them to keep from falling into the abyss.
- On this boss it is recommended to form the raid composition as follows: 2 tanks, 4 healers and 14 fighters. This approach will positively contribute to the rapid killing of the boss and spiders, as well as minimize the necessary healing mechanics in the 2nd phase of the battle.
Boss abilities
Stage One: Ice Climbers
- Breath of Ice ➜ Creates an "Icy Ground", characters slide across it while taking periodic damage.
- Chilling Blast ➜ Imposes a debuff on all characters (4 second duration). When the debuff ends or dissipates, an explosion occurs that deals average damage within a 4 meter radius. Do not attempt to dispel this debuff, just gain a distance of 4 meters from each other.
- Enveloping Webs ➜ Envelopes several random characters for 6 seconds. During this period of time, the character takes serious periodic damage. "Sticky Webbing" appears underfoot - protects against slipping/moving for 60 seconds. Reduces the character's movement speed by 50%. Applies debuffs while standing in the web. "Caustic Eruption" (spider) removes this effect.
Mythic: "Sticky Webbing" lies for 10 minutes.
After accumulating 5 webbing effects, the player is restrained in "Wrapped in Webs" - stun for 30 seconds. The stun can be removed with "Caustic Eruption". - Gossamer Burst ➜ Entangles players, dealing high physical damage while pulling them into a cliff. It is recommended to use acceleration at this stage, and to position behind "Sticky Webbing" (for 100 energy).
- Boss summons mobs: Frostbreath Arachnid and Caustic Spiderling (the article below details how to properly fight these types of mobs).
- Web Blast ➜ a powerful blow to an active tank, imposes a debuff that increases the damage received from the next similar blow by 50% (cumulative).
- Gusting Rime ➜ rotating ice columns, knock back characters and deal 121k damage on impact (do not touch the columns).
Stage Two: The Frozen Precipice
The second phase of the battle with Sennarth, the Cold Breath begins at the fifth minute of the battle (05:00).
- The boss crawls to the top and envelopes itself in a shield that reduces all damage dealt to it by -99%. The boss deals AoE damage to all members of the raid and inflicts a cumulative debuff. The task of the raid members is to reach and interrupt the spell as quickly as possible. On the last platform, there is now a skating rink everywhere.
- In the second phase of combat, "Frost Expulsion" leaves behind "Glacial Plume". An area appears that does a lot of damage and repels characters that touch it. If you have enough time to kill the boss, then you can try to compact them around the edge so they don't get in the way of the players.
- Suffocating Webs ➜ Boss shoots a tank and a few random players. Inflicts a debuff on his victims that deals periodic physical damage every second for 6 seconds. When the debuff ends, players are discarded and wrapped in "Wrapped in Webs", and "Sticky Webbing" forms next to them".
- Sticky Webbing ➜ Similar to the first combat phase.
- Wrapped in Webs ➜ Same as the first combat phase.
- Repelling Burst ➜ Deals medium damage and repels characters (do not stand on the edge of the platform).
- A +10% cold vulnerability debuff is added to all players. Up to the point of death - Enrage.
- Caustic Spiderling ➜ All abilities of the mobs are completely similar to the first phase of combat.
- Permafrost ➜ Ice begins to gradually fill the space below the lair (from bottom to top), dealing damage with each effect and stacking.
Boss Minions (Mobs)
At the beginning of the fight, the boss summons mobs, so players will have to fight Frostbreath Arachnid (x1) and Caustic Spiderling (x5) at once.
Frostbreath Arachnid
- Only 3 mobs appear on each platform for the entire fight.
- Freezing Breath ➜ Frontal sector, deals high damage and leaves an "Icy Ground".
- Chilling Aura ➜ Surrounds itself with an aura that deals moderate damage to all raid members while increasing its vulnerability to ice magic by 25%.
- The appearance of this mob zeroes the boss's energy.
Caustic Spiderling
- These mobs will come throughout the boss battle.
- Caustic Eruption ➜ Explodes on death, dealing average damage within a 5 meter radius (do not stand in the center of the explosion). The damage from the explosion destroys spider webs on the ground, as well as removing web effects from characters and destroying cocoons.
Mythic: Applies the effect "Dissolved Defenses" ➜ increases the character's damage from the forces of nature by 300% for the next 30 seconds (can stack).
Useful information for players
For Tanks:
- Every 5 seconds the boss casts a debuff on the tank, it is recommended to change at 7-8 effects (this can vary depending on class or equipment).
- The free tank keeps the mobs on it.
It is recommended to bring Caustic Spiderling to "Wrapped in Webs" to destroy cocoons. - Do not kill Caustic Spiderling near puddles of spider webs you plan to use.
- Be sure to turn Frostbreath Arachnid away from raid members (these mobs do cone damage).
For Healers:
- You must use powerful defenses during web explosions, as well as when spider aura damage is triggered.
- Never Dispel "Chilling Blast", as you may accidentally kill a raid member with this action.
- Gradually stacking vulnerability on phase 2. Use powerful defense abilities on repulsion.
For DPS:
- At the very beginning of the fight, you should use Heroism / Bloodlust in combination with the most powerful abilities. This is necessary so that at the fifth minute of the battle (05:00) the boss has as little health as possible (ideally 37% or lower).
- Lay out "Sticky Webbing" close to the edge of the platform to prevent pulling down to the boss.
Note: 12/13 classes may lay out the entire web at one point underneath themselves to avoid spreading it across the platform. - If your character is affected by "Chilling Blast", then move away from other players to the required distance.
- Use powerful abilities against Frostbreath Arachnid, try to kill this mob as fast as possible.
Always remember that extra aura damage can kill you.
Lifehacks
- Ice puddles and swirls, appear next to the characters. Try not to direct them forward, it's better to leave them behind.
- Each platform can be roughly divided into two halves. Making this decision will help you conveniently direct ice and swirls to then play on the clear half of the platform.
- The pillar will keep you from being constricted. With proper dexterity, you can ignore the cobwebs and also ignore the ties standing behind the columns. Be sure to remember that if there is ice under the column, then you will be pulled in.
- Warlock's gates work through columns and spikes and other textures along the edge of stairs (most likely a bug).
- Death knights can ignore all screeds.
- Characters with immune abilities can swarm "Glacial Plume" during the second phase.
- A monk can use "Transcendence: Transfer" to survive every second (even or odd) screed, and ignore the rest while behind the pillars. "Roll" and "Tiger's Lust" are rationally used when traversing stairs. This algorithm is relevant for the first and second phases of combat.
- "Glacial Plume" will not save you when using boss repulsion.
- Death Knight can purge "Glacial Plume" with the class ability "Anti-Magic Shell" during the second phase of combat.
Useful class and racial abilities:
This information will help you make boss battles easier by removing the negative effects of webbing, slowdowns, and stuns.
Class / Race |
Ability |
Description |
| Mage | Prismatic Barrier + Mass Barrier |
Reduces the duration of malicious effects. |
| Ice Block | Removes stuns and effects that slow movement. | |
| Monk | Tiger's Lust | Increases movement speed and removes the effects of immobilization and slowing (can be used on allies). |
| Death Knight (DK) | Icebound Fortitude | Immune to stun effects. |
| Shaman | Ghost Wolf + Thunderous Paws |
Removes all slowing effects and increases movement speed. |
| Hunter (Hunt) | Disengage + Posthaste |
Increases movement speed and removes effects that hinder movement. |
| Master's Call + pet on the sly |
Removes effects that hinder movement (can be used on allies). | |
| Priest | Fade + Phantasm |
Removes all slowdown effects. |
| Druid | Shapeshift Form | Removes effects that make it difficult to move. |
| Demon Hunter (DH) | Vengeful Retreat | Removes effects that hinder movement (relevant only for fighters). |
| Warlock | Demonic Circle | Teleportation, which removes effects that impede movement. |
| Burning Rush | Removes effects that make it difficult to move. | |
| Paladin | Divine Shield | Removes all negative effects, movement difficulties and stuns. |
| Hand of Freedom | Immunity to effects that hinder movement (can be used on allies). | |
| Blessing of Protection | Immune to negative effects (can be used on allies). | |
| Rogue | Cloak of Shadows | Removes all harmful effects. |
| Vanish | Removes effects that make it difficult to move. | |
| Evoker | Deep Breath | Removes effects that make it difficult to move. |
| Human | Will to Survive | Removes all stun effects. |
| Gnome | Escape Artist | Removes effects that make it difficult to move. |
| Dark Iron Dwarf | Fireblood | Dissipates negative effects. |
Map of the battle
 |
Battle Chronology
This chronology is compiled to allow for a margin of error in the calculations, which can be approximately +/- 2 seconds.
Boss timers |
Note in MRT format |
|||
| 00:18 | Spread out | {time:00:24} | 00:24 | Spread out |
| 00:20 | Enveloping Webs | {time:00:41} | 00:41 | Tightening |
| 00:39 | Tightening | {time:00:44} | 00:44 | Stairs |
| 00:48 | Enveloping Webs | {time:01:01} | 01:01 | Spread out |
| 01:15 | Tightening (hide behind the pillars) |
{time:01:21} | 01:21 | Tightening |
| 01:17 | Enveloping Webs | {time:01:38} | 01:38 | Spread out |
| 01:34 | Spread out | {time:02:07} | 02:07 | Spread out |
| 01:43 | Enveloping Webs | {time:02:23} | 02:23 | Stairs |
| 01:44 | Arachnid № 2 | {time:02:24} | 02:24 | Tightening |
| 02:01 | Spread out | {time:02:45} | 02:45 | Spread out |
| 02:03 | Enveloping Webs | {time:03:04} | 03:04 | Tightening |
| 02:22 | Tightening (hide behind the pillars) |
{time:03:22} | 03:22 | Spread out |
| 02:29 | Enveloping Webs | {time:03:47} | 03:47 | Spread out |
| 02:40 | Spread out | {time:04:02} | 04:01 | Tightening |
| 03:00 | Tightening (hide behind the pillars) |
{time:04:02} | 04:02 | Stairs |
| 03:02 | Enveloping Webs | {time:04:24} | 04:24 | Spread out |
| 03:17 | Spread out | {time:04:41} | 04:41 | Tightening |
| 03:26 | Arachnid № 3 | {time:05:01} | 05:01 | Phase 2 |
| 03:42 | Spread out | {time:05:16} | 05:16 | Spread out |
| 03:44 | Enveloping Webs | {time:05:35} | 05:35 | Impetus |
| 04:02 | Tightening (hide behind the pillars) |
{time:05:49} | 05:49 | Spread out |
| 04:12 | Enveloping Webs | {time:06:09} | 06:09 | Impetus |
| 04:21 | Spread out | {time:06:22} | 06:22 | Spread out |
| 04:41 | Tightening (hide behind the pillars) |
{time:06:43} | 06:43 | Impetus |
| 04:42 | Enveloping Webs | {time:06:57} | 06:57 | Spread out |
| 04:58 | Shield at -99% damage | {time:07:17} | 07:17 | Impetus |
| 05:06 | AoE damage + ice | {time:07:29} | 07:29 | Spread out |
| 05:15 | Spread out (stand at the edge) |
{time:07:49} | 07:49 | Impetus |
| 05:24 | Suffocating Webs | {time:08:03} | 08:03 | Spread out |
| 05:35 | Repulsion | {time:08:24} | 08:24 | Impetus |
| 05:48 | Spread out | - | ||
| 06:10 | Repulsion | |||
| 06:14 | Suffocating Webs | |||
| 06:23 | Spread out | |||
| 06:45 | Repulsion | |||
| 06:57 | Spread out | |||
| 07:03 | Suffocating Webs | |||
| 07:19 | Repulsion | |||
| 07:31 | Spread out | |||
| 07:53 | Repulsion | |||
| 07:57 | Suffocating Webs | |||
Blog Tags
| 🔥 EXCLUSIVE WoW SERVICES – FAST & SAFE! 🔥 | ||||

Gold⚡ Instant Delivery 2-3 min Buy Now |

Raids⚔️ Start in 20-30 min Buy Now |

Mythic+💀 Any Difficulty Mode Buy Now |

PvP🏆 Play with Gladiators Buy Now |

Coaching🎮 Learn from real boosters Buy Now |
| ✅ 100% Safe – No Bots | ⭐ Trusted by 10,000+ Gamers | 🚀 Instant Delivery! | ||||

